Making modifications to our CC (the name of our travel trailer is Casa del Camino or CC) can take away from the adventure, relaxation, and wine time of RV living, however, the payoff is huge. The more we have modified CC, personalized her, the more we love her. I remember wanting to sell, upgrade, and go bigger, but really what we needed to do is make her our own rig.
I think it’s that way with anything you own, if you take care of it and make it your own, you love it more. My son and I lived in a townhouse that was very small for 19 years, 11 of them joined with my husband and stepson. It was crowded at times, especially when we had company over, but with creativity, it never felt too small and it certainly felt like home. The same goes with anything you own, you have to personalize it and learn how to make it work for you.
In this week’s video, we are tearing out the dinette, adding wallpaper, and upgrading our recliners. I didn’t know how important this upgrade was until it was done. I knew the space felt crowded but I didn’t know this modification would make that big of a difference.
Links to the products used in this modification:
- IKEA Expandable Table – chairs were not included
- Wallpaper from Amazon
- Single Ottoman Stool from Amazon – this is what we have at our table in white
- 30″ Ottoman with Storage – this is between our recliners in brown
- Snack Table – this is between our recliners with the bench under it.
- Bargain Furniture Barn, Gene Miller, Goshen, Indiana, 260-350-4654. No website, but we found him on Facebook marketplace
The Dinette and the Carpet
We wanted to keep this dinette for two reasons: (1) We needed a table and (2) so we had an extra bed. Well, we sit at the picnic table outside a lot, especially with guests, and we don’t have overnight guests who need to sleep in our rig. We spend most of our time in CC either in our recliners or in bed. The benches of the dinette became storage areas and created clutter that drove us both crazy. Remember, we are pros at creativity in a small space, we just had to give ourselves permission to demo our rig.
We were concerned about the carpet and what was behind the wall, rightfully so. We have seen enough demo’s to know that we should be ok, but one can never be sure. The walls had screw holes from where the dinette was screwed to the wall, this is why wallpaper was necessary. But, thankfully, the floor was fine. I just took a wire brush to the floor to pull up the matted down parts and then vacuumed it really well. You cannot tell there was once a dinette there at all!

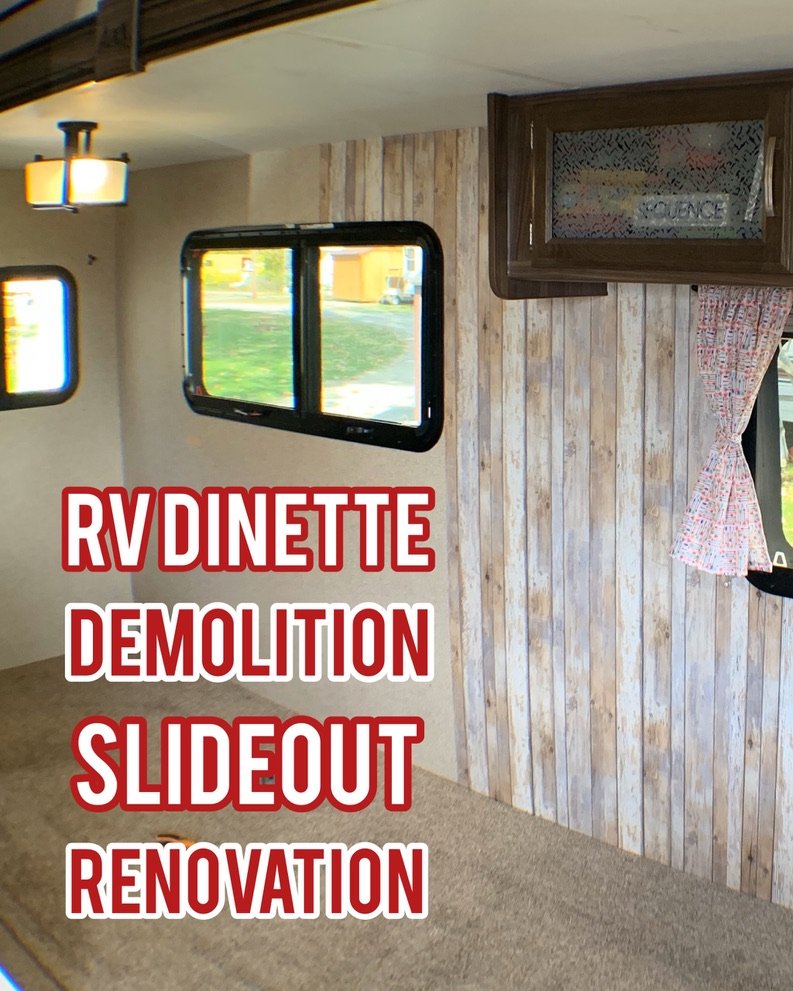
The Wallpaper
Picking out wallpaper wasn’t too much of a debate, we both wanted something that complimented the look we had already. We like the color scheme we have which is shades of brown with bright colors in our accent pieces. As we scrolled through Amazon, this wallpaper popped up. We weren’t sure because the name of it included “berry” but once it was on the walls it was perfect! The slideout has this warm, wood-grain, shiplap feeling with trinkets on the walls from our travels. All of our wall hangings are up with command strips.

The Recliners, Bench, Ottoman, Snack Table
If you have been following along for a bit you know that we are now on the 3rd set of furniture in CC. The rig came with a jackknife sofa, perfect if you have guests. We hated it because it was terribly uncomfortable. We found new recliners on Amazon, linked here, which we really liked but they weren’t comfortable enough and we didn’t want fabric recliners. However, we couldn’t justify spending the outrageous price RV stores wanted for Thomas Payner recliners. I searched on Facebook Marketplace for about a month when we found Bargain Furniture Barn. I think once we sell the previous recliners, we will only be out $100 on this part of the upgrade. Not bad!
We still needed storage space!
Though we didn’t use all of the bench storage in our dinette, we needed something. The 30″ bench that you see above between our chairs is perfect for grocery bags, our laptop bags, and miscellaneous items. The bonus: Brian removed the hinges and arms, moved them from the long side to the short side, now it opens up from what is the front for us. The table is perfect for beverages, stuff, and of course, it’s a cat hangout. The bench tucks right under it and because Brian moved the hinges to the back, it opens perfectly. Easy access and a ton of storage!
The white ottoman took a bit of searching as well because I wanted one that was the width of the table and tall enough for 2-liter bottles of soda. Most of the ottomans I found came in at 12″ and seemed to be too flimsy for our needs but this one is a whopping 18″ square. It fits 2-liter bottles of soda and wine bottles (wrapped in bubble wrap for travel) perfectly. I think I had 4 or 5 sodas and 4 bottles of wine with a bit of extra room. The ottoman also has a tabletop on the flip side of the lid and it came with a smaller ottoman which we don’t use. We can move this around for guests and can have a 3rd person at the table.
What You Don’t See – What We’re Repurposing
What you don’t see in our video is how we are repurposing parts of the dinette and we didn’t talk about it in the video because we didn’t know at the time what we were doing. The cushions from the bench were used to re-cushion the IKEA chairs and we re-covered them with fabric from leftover from the curtains. The chairs are so comfortable you can play games for hours!
The doors from the dinette are going to be used under the bed. We have a very thick queen size mattress on our bed and it’s too heavy to lift up even with the upgraded lift arms we installed. Therefore, Brian is working on figuring out how to install the doors and then we will have under the bed storage bins that we can roll out. This will probably be where we store our hiking and biking gear, maybe…
The dinette table itself will be used for a stovetop cover. Brian is going to have to get creative here, but I know he is up for the task. Stay tuned to our YouTube channel for a video on that once it’s complete.

The Final Look
This modification took a small space with impractical storage for us and created an ideal living space. When you live small you, of course, have to downsize your stuff but the things you use regularly must be practical, comfortable, and provide easy access to your storage. It took us a bit but (I think) we have created that space that is perfect for us.
Have questions? Need help with your upgrades? Have better ideas? Share, ask, comment below. We love to hear from you. Follow our journey on social media if you want to see where we are this week.
Until next time…