Recipe of the Week – Honey Ginger Scallion Chicken

Ready for another tasty and easy marinade and basting sauce?  Our original recipe for Honey Ginger Scallion Chicken is another great marinade that you can throw together in a few minutes and is sure to please everyone at the campsite.
To prepare the marinade, chop 4 green onions, 2 cloves of garlic, and 1 T of fresh ginger.  If you’ve never worked with ginger, don’t worry. Look for it in the produce department, often near the garlic and shallots.  Ginger comes in “hands” because the large pieces often have several smaller “fingers.” If you’re like us, you don’t need that much at one time, but you can break off a finger to get as much or little as you need (think like breaking a bunch of bananas in half to buy just a few). I cut off the edges and thin skin to end up with a small piece about the size of 2 dice.  Cut thin slices, cut again into julienne, and finally mince. In the picture, the ginger is in the center.
IMG_3985
Combine with 1 T honey, 2 T soy sauce (or our favorite, San-J Gluten Free Tamari), a few dashes of Crystal hot sauce and mix well.  You could marinate for 2 hours to overnight, but I wanted to try something different this night.
IMG_8061
We picked up a grilling mat after hearing lots of people talking about how much they liked them. On this evening, after getting a good fire going, we flipped over the grill, and added the mat.  Place the chicken on the mat and pour some of the sauce over.  Once the chicken is done on the bottom, flip and add some more of the basting sauce. Flip once more just to make sure that everything is cooked through.
IMG_3176
We served this with some store-bought coleslaw, but any deli salad would be a great addition.  Let us know in the comments what your favorite deli salad is.
IMG_6046

Honey Ginger Scallion Chicken

  • 4 green onions
  • 1 T minced ginger (about 2 inches of a ginger finger)
  • 2 cloves minced garlic
  • 1 T honey
  • 2 T soy sauce
  • Dash hot sauce to taste

This makes enough sauce for 4-6 chicken breasts.
Combine all ingredients in a bowl.
On a hot grill, place chicken on a grill mat and baste with the sauce, turning and basting again as each side cooks.

Recipe of the Week – Asian Marinated Chicken with Corn and Basil Faux Fried Rice

When we’re camping, we love meat marinades.  Before we leave town, we can weigh out several meals and prep various marinades then throw them into plastic storage bags and toss them into the freezer.  While we’re out on the road, lay the prepped bag out in the fridge the night before and it’s ready to cook the next evening.
This Asian marinated chicken works great with the corn and basil fried rice, but it is also good with slaw, a salad, or any other sides that might be convenient at the campground.
IMG_1263
To prepare the chicken, place 1/3 c sliced green onions, 2 t minced garlic in a plastic bag with 3 T of soy sauce (we use San-J Tamari since it’s gluten free) and 2 T of mirin. Wait, you didn’t bring mirin to the campground with you?!  Mirin is a sweet rice wine common in Asian cooking but a good substitution would be any sweet or semi-sweet white wine that you like.  I used Chateau St. Michelle Riesling.  To the bag, add 4-6 oz of chicken for each person you are serving. The recipe calls for thighs, but we used boneless skinless breasts this time. Let the meat marinate for at least 2 hours in the refrigerator or overnight.  If you’re not going to cook it within 24 hours, put it in the freezer.
IMG_7014
When it’s time to cook, get your grill preheated while you prep the fried rice.  Rinse 1 cook of basmati rice in a sieve.  This will help remove some of the starches and will produce a less sticky rice in the end. Place the rice in a pan with 2 c of cold water, bring to a boil, reduce heat and cover for 15 minutes.  Remove from heat, fluff with a fork and leave the lid off to cool a little.  Precooked rice in a bag from the grocery is a great alternative to cooking in the RV and getting things hot inside.
IMG_2883
In a large skillet over medium heat, add 1 T oil. Add 2 T thinly sliced green onions and sauté for about 30 seconds, being careful not to burn.  Add ¾ c of frozen corn (or 2 smallish ears if using fresh) and let cook for another minute or two to thaw out the corn.  Finally add the rice and 1-2 T of soy sauce.  Let sauté for an additional 5 minutes stirring occasionally. You want the bottom and edges of the rice to get a little crispy. At the last minute, stir in ¼ c of basil cut into a chiffonade.  To cut the chiffonade, stack the basil leaves with the largest leaves on the bottom. Roll them into a little cigar and then slice into thin ribbons.
IMG_5602
IMG_9957
Cook the chicken on the grill, discarding any marinade left in the bag.
IMG_8808
To serve, divide the rice among four plates, top with chicken and zest a lime over the chicken. Cut the zested lime into slices and serve on the side.
IMG_7519
Find the original recipe from Cooking Light, September 2012, here.

Asian Marinated Chicken with Basil Faux Fried Rice

Chicken:

  • 1/3 c sliced green onion
  • 2 t minced garlic
  • 3 T soy sauce
  • 2 T mirin (or sweet white wine)
  • 4 4-6 oz chicken breast pieces or chicken thighs

Rice:

  • 1 c basmati rice, rinsed
  • 1 T olive oil
  • 2 T sliced green onion
  • ¾ cup frozen corn (or 2 small ears, kernels removed)
  • 1-2 T soy sauce
  • ¼ c basil cut into chiffonade

Place all chicken ingredients into a plastic bag and let marinate 2 hours or overnight.
Prepare rice by adding 2 cups of cold water in a sauce pan.  Bring to a boil, reduce heat and cover, cooking for 15 minutes.
Heat a skillet or wok with oil.  Add green onion and sauté for 30 seconds.  Add corn and cook another 2-3 minutes.  Finally add rice and soy sauce, cooking for an additional 5 minutes, allowing bottom and edges to get crispy.
Cook chicken on a medium high grill until done.  Discard the bag with marinade.
Divide rice between four plates and top with chicken.  Grate lime zest over chicken.  Cut the lime into wedge and serve on the side.

Recipe of the Week – Taco Rice Salad

Taco Rice Salad has all the favor of tacos or nachos without the calories of chips or wraps. We enjoy it as a quick dinner or even leftover for lunch. It reminds us a little of the popular bowls at places like Hothead or Chipotle.
Start out mincing some garlic and tossing it a skillet with a pound of ground beef over medium high heat until browned. When it’s almost done add 1 cup of frozen corn kernels to thaw them out. If you are using fresh corn add it to the salad later. In a separate pot, make the yellow rice mix according to instructions. We use Zatarain’s Yellow Rice and Laura’s Lean Beef.
IMG_8020.JPG
Drain out the fat and add 3 cups of cooked yellow rice, 1 t each ground cumin and chili powder, and 1/4 t each salt and pepper (you may want to omit the salt, some of the rice mixes are pretty high in sodium). Let the whole mixture cool slightly.

On each plate, place about 1 1/2 cups of chopped romaine lettuce, 1/2 cup of chopped tomato, 1/4 cup of drained black beans, and a sprinkling of chopped red onion (also the corn if you’re using fresh).
IMG_4370.JPG
To make dressing combine 2/3 cup each of Greek yogurt and salsa with 1 t chili powder and 1/2 t ground cumin in a bowl.  We like Pace Salsa and Fage 2% Greek Yogurt.
IMG_3306
Spoon beef mixture over lettuce and top with Sargento shredded cheddar cheese and dressing. Serves 4-6 hungry people.
IMG_4238
Here’s the original recipe from myrecipes.com and here is my modified version:

Taco Rice Salad

Salad:

To prepare salad, heat a large nonstick skillet over medium-high heat. Add beef and garlic, and cook until browned, stirring to crumble. Add frozen corn (if using). Drain; return beef mixture to pan. Stir in rice, spices, and salt and pepper.  Cool slightly.

Layer lettuce, tomato, fresh corn( if using), onion, and beans on plates.

To prepare dressing, combine Greek yogurt, salsa, 1 teaspoon chili powder, and 1/2 teaspoon cumin, stirring with a whisk.
Top with 3/4 cup rice mixture, 1/3 cup of dressing, and about 1 1/2 tablespoons cheese.

 
Let us know what you think of this make at home version of your favorite restaurant bowl.

Recipe of the Week – Easy Chicken and Potato "Kabobs"

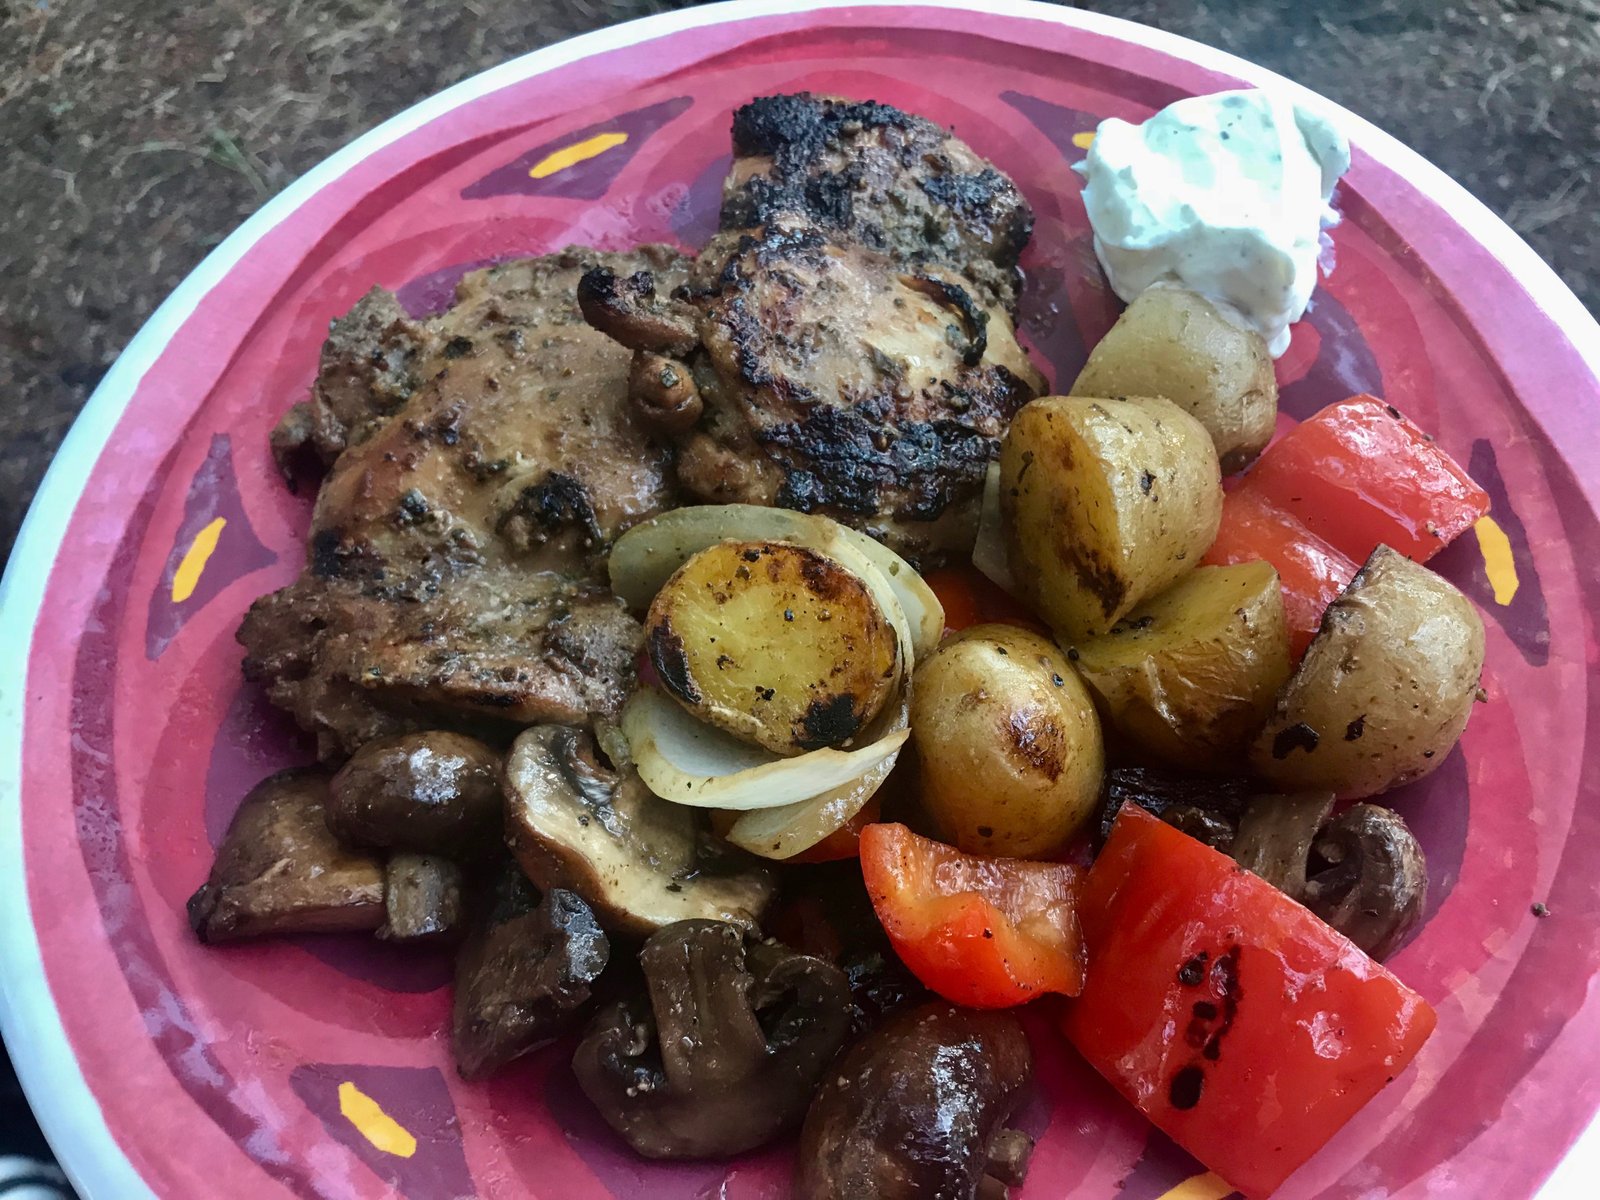
I love to cook, that is not a surprise to anyone who knows me (Brian).  I don’t love to spend a lot of time cooking usually (though I do believe that making a wonderful, intricate recipe can also be very cathartic in the right time and place).  This recipe from the Baking Beauties at Faithfully Gluten Free is simply my all time favorite marinade.  I call it dump marinade because it has a little bit of everything in, you can dump in any protein you want, and it will come out amazing.  Kabobs are a challenge to me.  It is difficult to get everything done together without burning the more delicate items, hence the second dump of this recipe, where I just throw it all on the grill and forget the skewer!
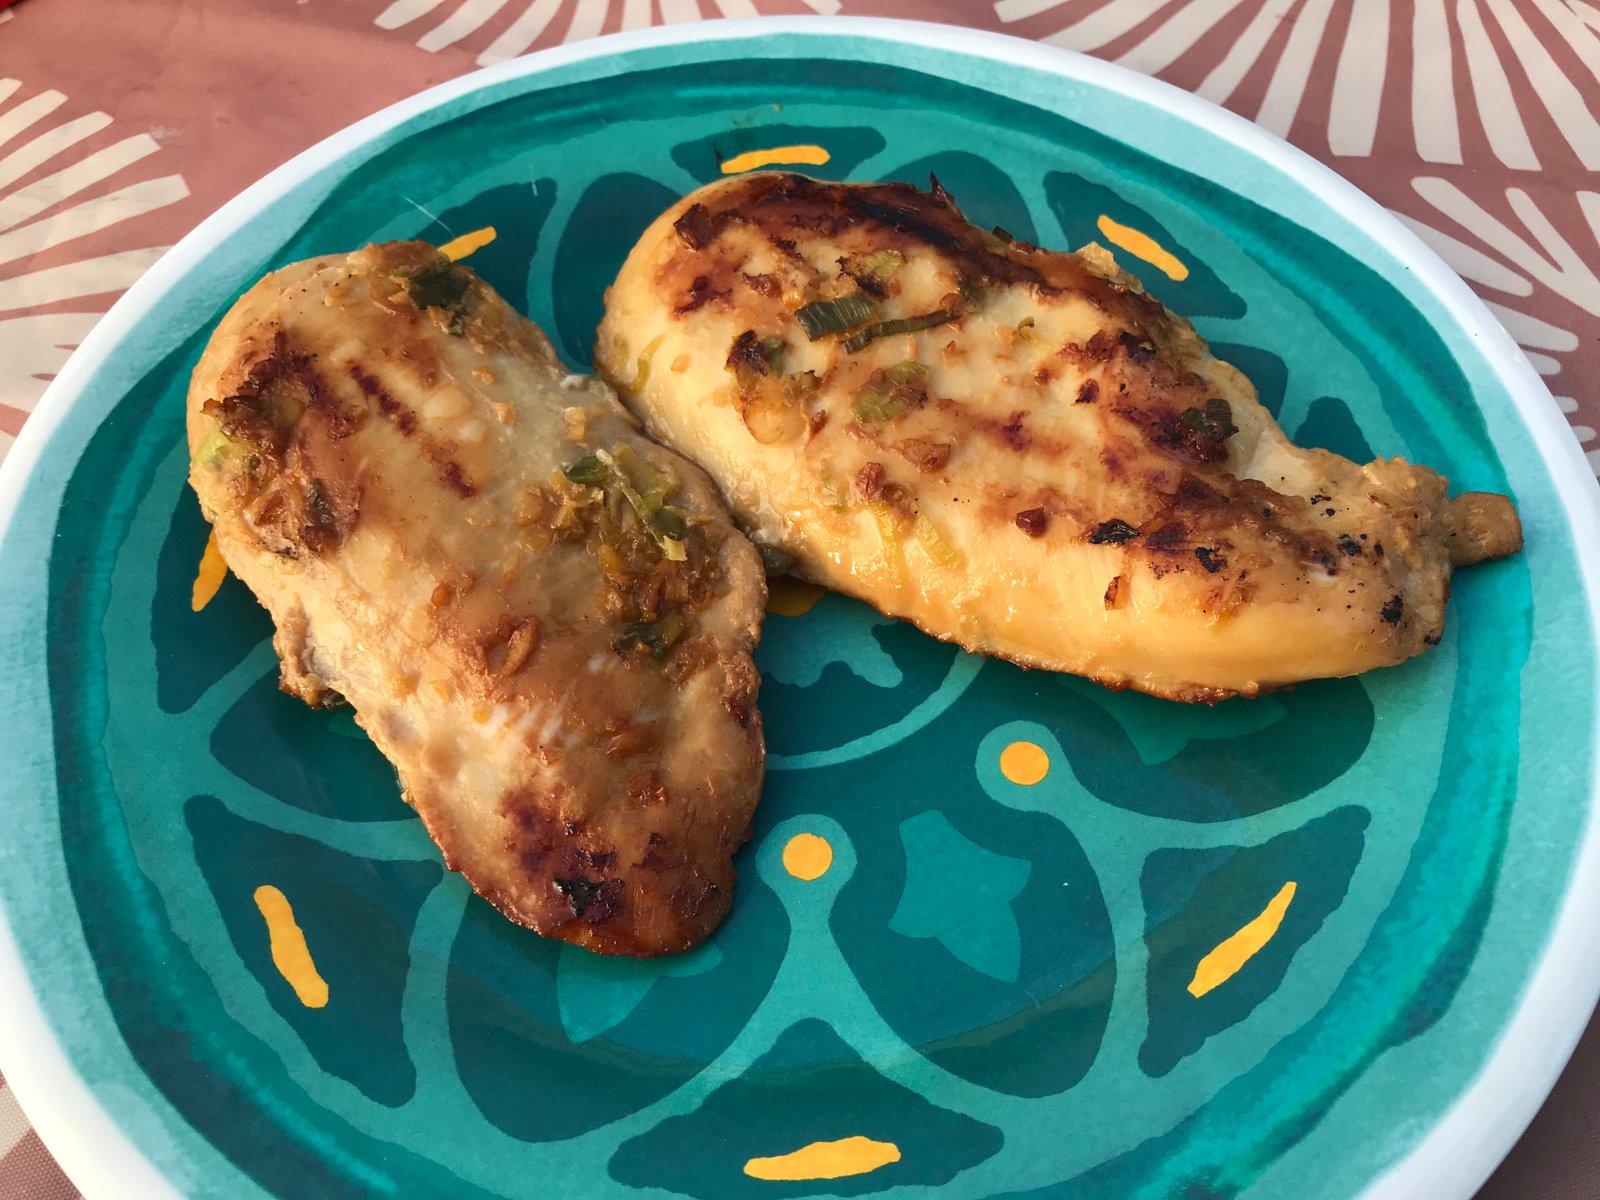
First the marinade: Put into a gallon resealable bag put 1/4 t dried rosemary (I didn’t carry rosemary in the RV this time so substituted dried oregano and it worked just fine), 1/2 t each of dried parsley, garlic powder, and black pepper, 1 t stone ground mustard, 1 T each balsamic vinegar, soy sauce, and Worcestershire sauce, and 2 T olive oil.  WOW that’s a lot of ingredients!  Now throw in about a pound of your favorite protein.  We love this with chicken thighs (in the pictures) but beef works well too (or country style pork ribs, chops, or an old tire, seriously this marinade tastes that good!).  A note on gluten free: soy sauce is one of those items with hidden gluten in it, always make sure to check labels of sauces and condiments to ensure they are safe if you or someone you are cooking for can’t have gluten.IMG_5847
Let the meat marinade for at least two hours.  I put the meat in the marinade the night before but we ended up eating out the next day so I just threw the whole thing in the freezer.  A week later, I took the bag out one evening and cooked it up the next day, it was still perfect!
Even the smallest potatoes take forever to cook on a grill.  Here’s a great tip stolen from the Baking Beauties: cook them in the microwave first!  I put them in and hit the potato button, they always come out a little under done, but then the time on the grill with the other raw veggies, and they are perfect! (Too many explantation points in this post, but I really love this recipe!)
We always add onions and mushrooms at minimum when we cook this meal but bell pepper, asparagus, zucchini, and summer squash are also great additions.  Cut your veggies into largish bite sized pieces.  The less dense the vegetables are, the bigger the pieces should be so they hold up.  Here’s another tip for the mushrooms: if you cut it in half and find lots of dark fins (especially common in portobello), scoop them out with a spoon or knife because they are bitter and turn mushy when cooked.
IMG_1062
If you are assembling kabobs, layer meat, potatoes, and veggies (obviously not the asparagus, but if you get one on a skewer, please put a picture in the comments, haha) onto a wooden or metal skewers. Don’t forget that wooden skewers should always be soaked in water for 30 minutes first to keep them from catching on fire.  I like the metal ones because they help to cook the food from the inside a little too.
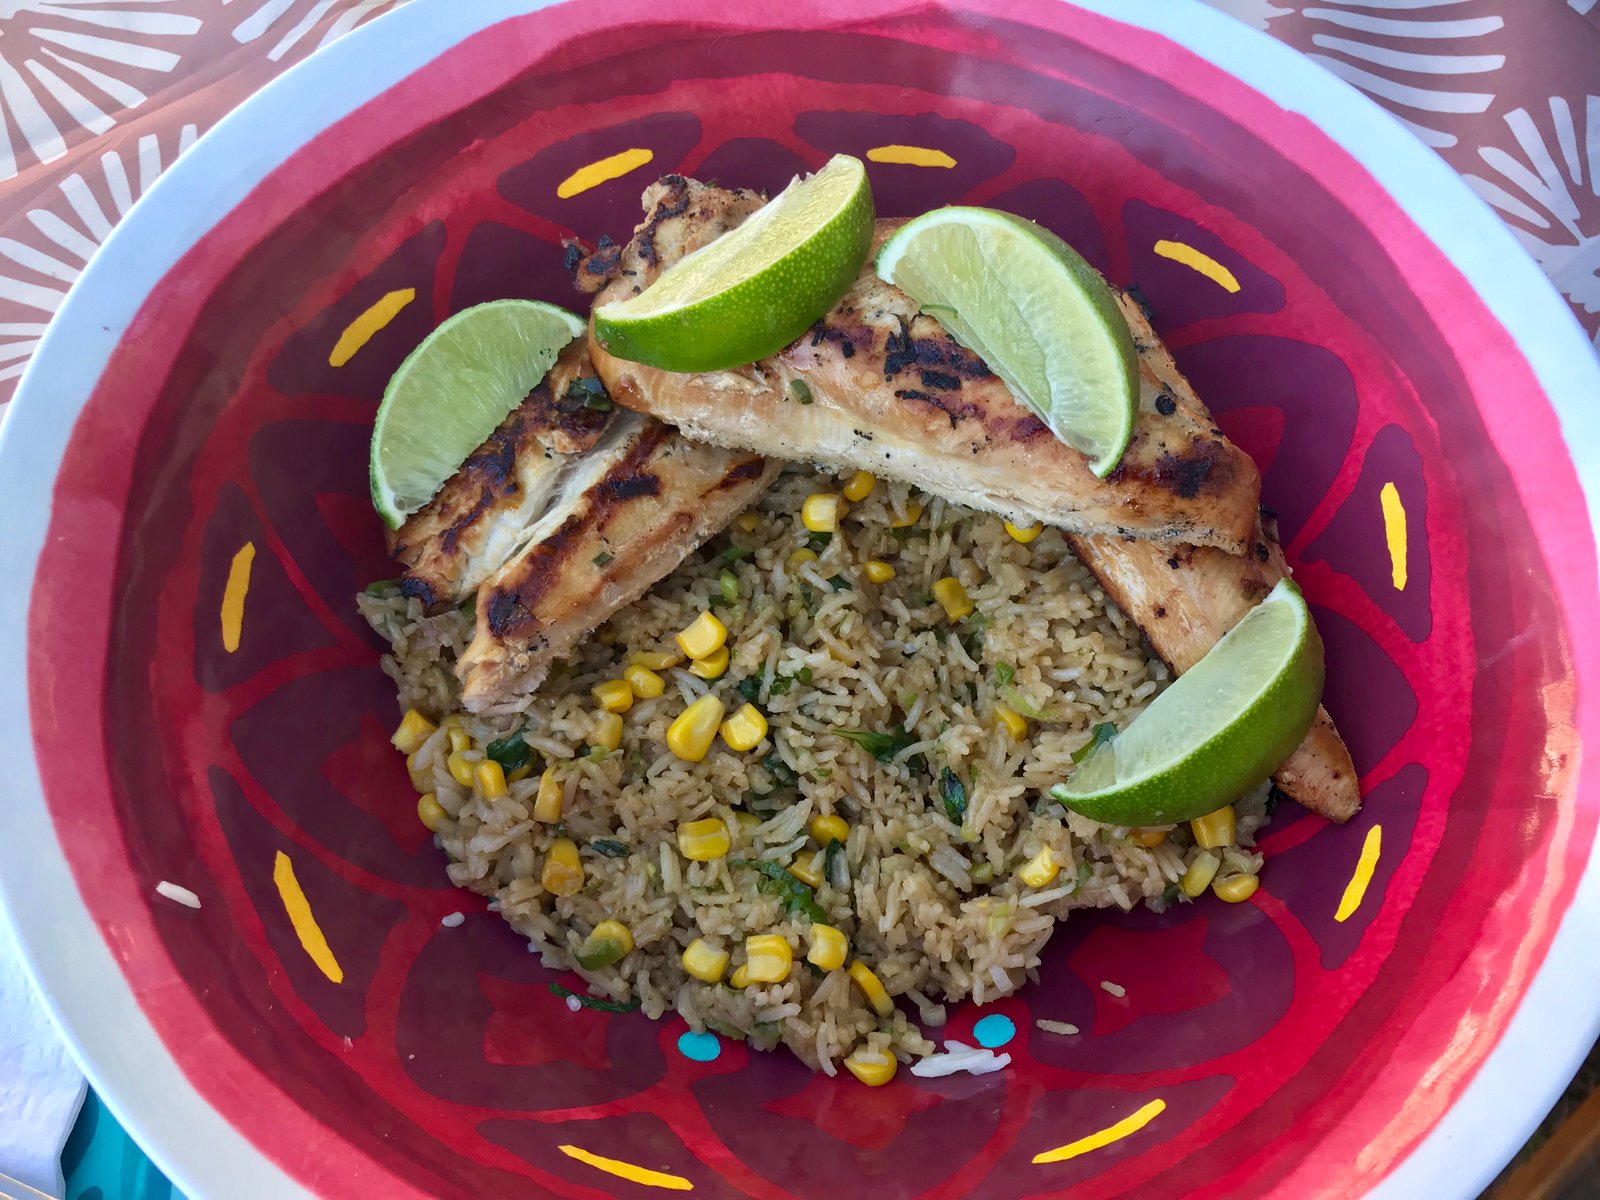
I don’t like to take the time to thread skewers most of the time, so I toss all the veggies together, drizzle with some oil and salt and pepper and toss ’em on the grill.
IMG_0845
If you use foil, poke a few holes so the juices run out – you want crispy browned edges, not a soggy mess.

Once the veggies get going, put the meat on the grill and cook to your desired degree of doneness.
IMG_3977
YUM!! BTW, thats a little bit of ranch dip on the side. It’s amazing on the potatoes!
IMG_0456

Easy Chicken (or Steak) “Kabobs”

For the marinade:

  • 1/4 t dried rosemary (or other dried herb such as oregano or basil)
  • 1/2 t dried parsley
  • 1/2 t garlic powder
  • 1/2 t ground pepper
  • 1 t stone ground or dijon mustard
  • 1 T balsamic vinegar
  • 1 T soy sauce or tamari sauce
  • 1 T Worcestershire sauce
  • 2 T olive oil

For the grill:

  • 1 lb chicken thighs or marinating beef
  • 1 lb of small potatoes (red or Yukon)
  • Optional bell peppers, onion, mushrooms, etc.

Mix all of the marinade ingredients into a resealable plastic bag and smoosh them around to make sure everything is mixed. Add the meat and refrigerate for at least 2 hours or overnight.
Soak wooden skewers in water to keep them from catching on fire.
Cook the potatoes in the microwave until almost completely done. Cut other veggies into similar sized pieces.
Thread all of the ingredients onto skewers and discard used marinade or…
Place veggies in a bowl and drizzle with oil, salt, and pepper. DO NOT put used marinade onto the veggies, as tempting as they may be. No one wants a side of salmonella with their dinner!
Place kabobs onto a medium high grill and turn every few minutes until done or…
Place veggies on grill and toss occasionally to keep searing fresh sides without burning. Place meat along side and turn after about 3-5 minutes.
Serve immediately with a cold beer and enjoy!

Recipe of the Week – Pasta with Roasted Cauliflower, Tomatoes, and Pepperoni

Before you turn your nose up on this one, keep on reading.  It doesn’t sound like its going to work, but it is actually really good and quite easy to make over the campfire itself, at home in the oven, or even on the grill.
IMG_8975The original recipe comes from the January 2013 issue of Women’s Day and you can find it here.
If you’ve been reading my recipes so far, you know that I don’t do a great job of following the recipe exactly, and this one is no exception so read carefully for my modifications. As always, I’ve cut the recipe in half during preperation since only two of us are eating and we don’t want leftovers.  All of the quantities listed are the full amounts.
Start off by cooking 12 oz of your favorite short pasta.  Shells or rotini would work best.  We use gluten free pasta when we cook because Michelle is celiac.  There is some debate about adding oil to your cooking water.  Generally you SHOULD NOT do it but this recipe is an exception.  When you pour the pasta out of the pan, the oil floating  on the top of the water will coat the pasta which will help keep it from sticking together while it waits to be added to the grill.  This is the same reason you should not do it normally, it will keep the sauce from sticking to the pasta!
While the pasta is cooking, cut up a smallish head of cauliflower into bite size flowerettes. If they are too big it will take longer to cook and you run the risk of burning the outsides.  Also cut up a pint of grape tomatoes into halves. Throw it all onto a grill pan (or piece of heavy duty foil). Next give it all a drizzle of olive oil, salt (not too much), pepper, and garlic pepper.  Finally top it with sliced pepperoni. Do not mix it up at this point.
IMG_7102
By now your pasta should be done cooking. Drain it and put it into your serving bowl.  If you didn’t add oil to the water, add a little now and mix it all together. Take everything outside to the grill.
IMG_7141
On a medium grill, let things get good and hot and once you see that the edges of the cauliflower are browning and the tomatoes are giving up some juice, start to mix it up a bit.  Now you just have to play it by ear.  You want the cauliflower to get nice and browned and the tomatoes to get a good blister.  I like it when the pepperoni get a little crunchy too, plus they will give up more oil which will lube up the veggies.IMG_6729
Once everything is to your desired degree of doneness, pour it on top of the pasta and mix it all together. Sprinkle with some parmesan cheese and fresh parsley or green onions and dinner is ready!IMG_7141 2
So my modification on ingredients was just the addition of the garlic powder and parmesan cheese.  You could also add lots of other veggies if you want. I think zucchini, asparagus, or mushrooms would all make a great addition.  If your not a pepperoni fan, smoked sausage, grilled chicken, or even shrimp could be nice.
Here’s my version, check out the link at the top if you want to cook the whole thing in the oven at home.

Pasta with Grilled Cauliflower, Tomatoes, and Pepperoni

  • 1 small head of cauliflower, cut into bite size pieces
  • 2 T olive oil, divided
  • Salt, pepper, and garlic powder to taste
  • 12 oz small pasta such as rotini or shells
  • 1 pint of grape tomatoes
  • 6 oz pepperoni
  • 2 T parmesan cheese
  • chopped parsley or green onions for garnish fish (optional)

Cook the pasta with a little oil in the pot.  While the pasta is cooking, layer the cauliflower and halved tomatoes on a grill pan or piece of heavy duty foil (on a cookie sheet to carry out to the grill).  Drizzle the remaining oil and sprinkle with salt, pepper, and garlic powder.  Cover with pepperoni.
Drain the pasta and take everything out to the grill.  Grill the veggies for about 3-5 minutes before stirring to mix the pepperoni in.  Let the cauliflower brown and tomatoes blister.
Mix the veggie mixture into the pasta and sprinkle with parmesan cheese and garnish.
Let us know what you think of this recipe by leaving a comment!

Recipe of the Week – Ground Turkey Sweet Potato Skillet

IMG_6579This week we’re making a quick one pot dish that can be made on the stove or over the fire that came from the Primavera Kitchen.  Not only is it gluten free, but also healthy and super tasty!
 

In a pot or iron skillet (especially if working over a campfire) heat 2 T of olive oil and brown 1 lb of ground turkey and a 1 clove of minced garlic.  I used 90% lean turkey, if you’re using a fattier ground, reduce the oil a little.
IMG_6577
Once most of the liquid is cooked out and the turkey starts to brown, add 1/2 c each of onion and bell pepper (we love the veggies, so I just use a whole onion and pepper since they add almost no calories).  Cook until soft and the onions start to brown a little.  It’s important to make sure that the liquid evaporates from the turkey before adding the pepper.  Sautéing peppers in liquid will make the skins bitter.
IMG_6578
Next add 1 1/2 cups of diced sweet potato (that’s about 1 whole decent sized potato), salt and pepper to taste, and a pinch of red pepper flakes (for some reason I don’t have any in the RV so a added a splash of Crystal Hot Sauce, which is my favorite).  Stir it all in and put the lid on it.  Make sure that you give it a stir once and a while and monitor the heat.  If it seems dry add a little water.  Cook about ten minutes until the sweet potatoes are soft.
Finally give it a sprinkle of mozzarella cheese and put the lid back on to give it a melt. At home I toss it under the broiler for a minute to give the cheese come color.
If you wanted to vary the recipe a little, you could always use ground beef or pork. Substitute Yukon gold or red potatoes, or even butternut or acorn squash.  A nice summer variation would be to throw in some zucchini or summer squash for the last few minutes of cooking (just make sure that things don’t get too wet and mushy).
IMG_6579
Don’t forget the beverage pairing! We like Atwater Vineyards Dry Rosé of Cabernet Franc.  Rosés go great with turkey at Thanksgiving dinner and they’re especially nice on a hot summer evening when you want something with a little more bite than a white wine.
If you make this recipe, snap a picture and tag #CruisinWithTheColemans on Instagram or post to the comments.

Ground Turkey Sweet Potato Skillet

  • 2 tbsp extra-virgin olive oil
  • 1 lbs extra-lean ground turkey
  • 1 tsp garlic clove, minced
  • ½ cup onions, diced
  • ½ cup bell pepper, diced
  • 1 ½ cups sweet potato, diced
  • Salt and freshly ground black pepper
  • A pinch of red chili flakes
  • ½ cup shredded mozzarella cheese

Directions:

  1. In an iron cast skillet, heat olive oil over medium-high heat.
  2. Add ground turkey and garlic. Stir occasionally and cook for about 7 minutes.
  3. Add onions and peppers and cook until onions are soft.
  4. Add the sweet potato, chili pepper, salt, and pepper.
  5. Cover the skillet and cook until they are tender. Don’t forget to stir occasionally. If necessary, add a little bit of water to cook the sweet potato.
  6. While the sweet potato is cooking, preheat the broiler.
  7. When the sweet potato is tender, add shredded mozzarella cheese and bring the skillet to the oven to melt the cheese* (see note below).
  8. When the cheese melts, remove from the oven, and serve.
* You can just put the lid on the skillet for 5 minutes. The cheese will melt.
 

Recipe of the Week – Taco Dip

This week Michelle and I are getting ready for our oldest son Calvin and his fiancée Carla’s wedding and the recipe is one that we got from Carla (who I believe got it from her mom).  This Taco Dip is pretty much like a traditional seven layer dip often served at parties, but we liked it so much we made it for dinner.  The recipe given here would easily serve 6 people as a meal and many more as part of a party table of other munchies. In the pictures, you are seeing the recipe halved so we didn’t have too much left over.
IMG_6539
Start out by browning a pound of ground beef and add a packet of your favorite taco seasoning.  (Remember in the picture, this is inly 1/2 pound.  I actually browned the entire pound and put half in the freezer for another meal later.) . Let the meat cool while you start the layers.
IMG_6540
In a bowl or baking dish (we used a Tupperware container and made two), spread 1 can of refried beans.  If you use the low fat variety, they are difficult to spread so it works better if you warm them up a little first.
IMG_6541-1
Mix together one 8 oz block of cream cheese with 1/3 a jar of salsa (as spicy or mild as you like it) and spread it on top of the beans.
IMG_6542-1
Sprinkle the cooled ground beef over the cream cheese mixture.
IMG_6543-1
Top the ground beef with shredded cheese.  We used a triple cheddar blend (we are in New York after all) but a Mexi-blend, taco cheese, Monterey jack, or pepper-jack would work well also.  Now you get the chance to throw the garden at it.  I added chopped green onion, but chopped tomatoes, red onions, shredded lettuce, cubed avocado, or sliced olives would all be good depending on your personal tastes.
IMG_6545
We served the dip with a Cabernet Sauvignon-Cabernet Franc blend from JR Dill Winery and tortilla chips. The bowl in the picture is 1/4 of the recipe.
I was trying to come up with a variation and here’s what I think would be really good: Substitute Italian seasoning for the taco seasoning in the ground beef and then layer with smashed white beans, cream cheese mixed with marinara, shredded provolone and fontina.  Serve with pita chips or toasted bread.  Call it lasagna dip?
Here’s the breakdown of the recipe:

Taco Dip

  • 1 lb ground beef
  • 1 packet taco seasoning
  • 1 can refried beans (regular full fat variety works best)
  • 8 oz cream cheese
  • 1/3 jar of salsa
  • 1 cup shredded cheddar cheese (or blend to taste)
  • Variety of toppings to taste: green onions, tomatoes, onion, olives, avocado, shredded lettuce to top

Layer one – beans
Layer two – cream cheese and salsa mixture
Layer three – ground beef taco meat
Layer four – shredded cheese
Top as you wish.
Let us know if you try either the dip or the variation and tell us what you think!

★ 25 years guiding ★ 48 U.S. states ★ 10 countries ★ 3,000+ Camino miles