Recipe of the Week – Creamy Cheese Soup

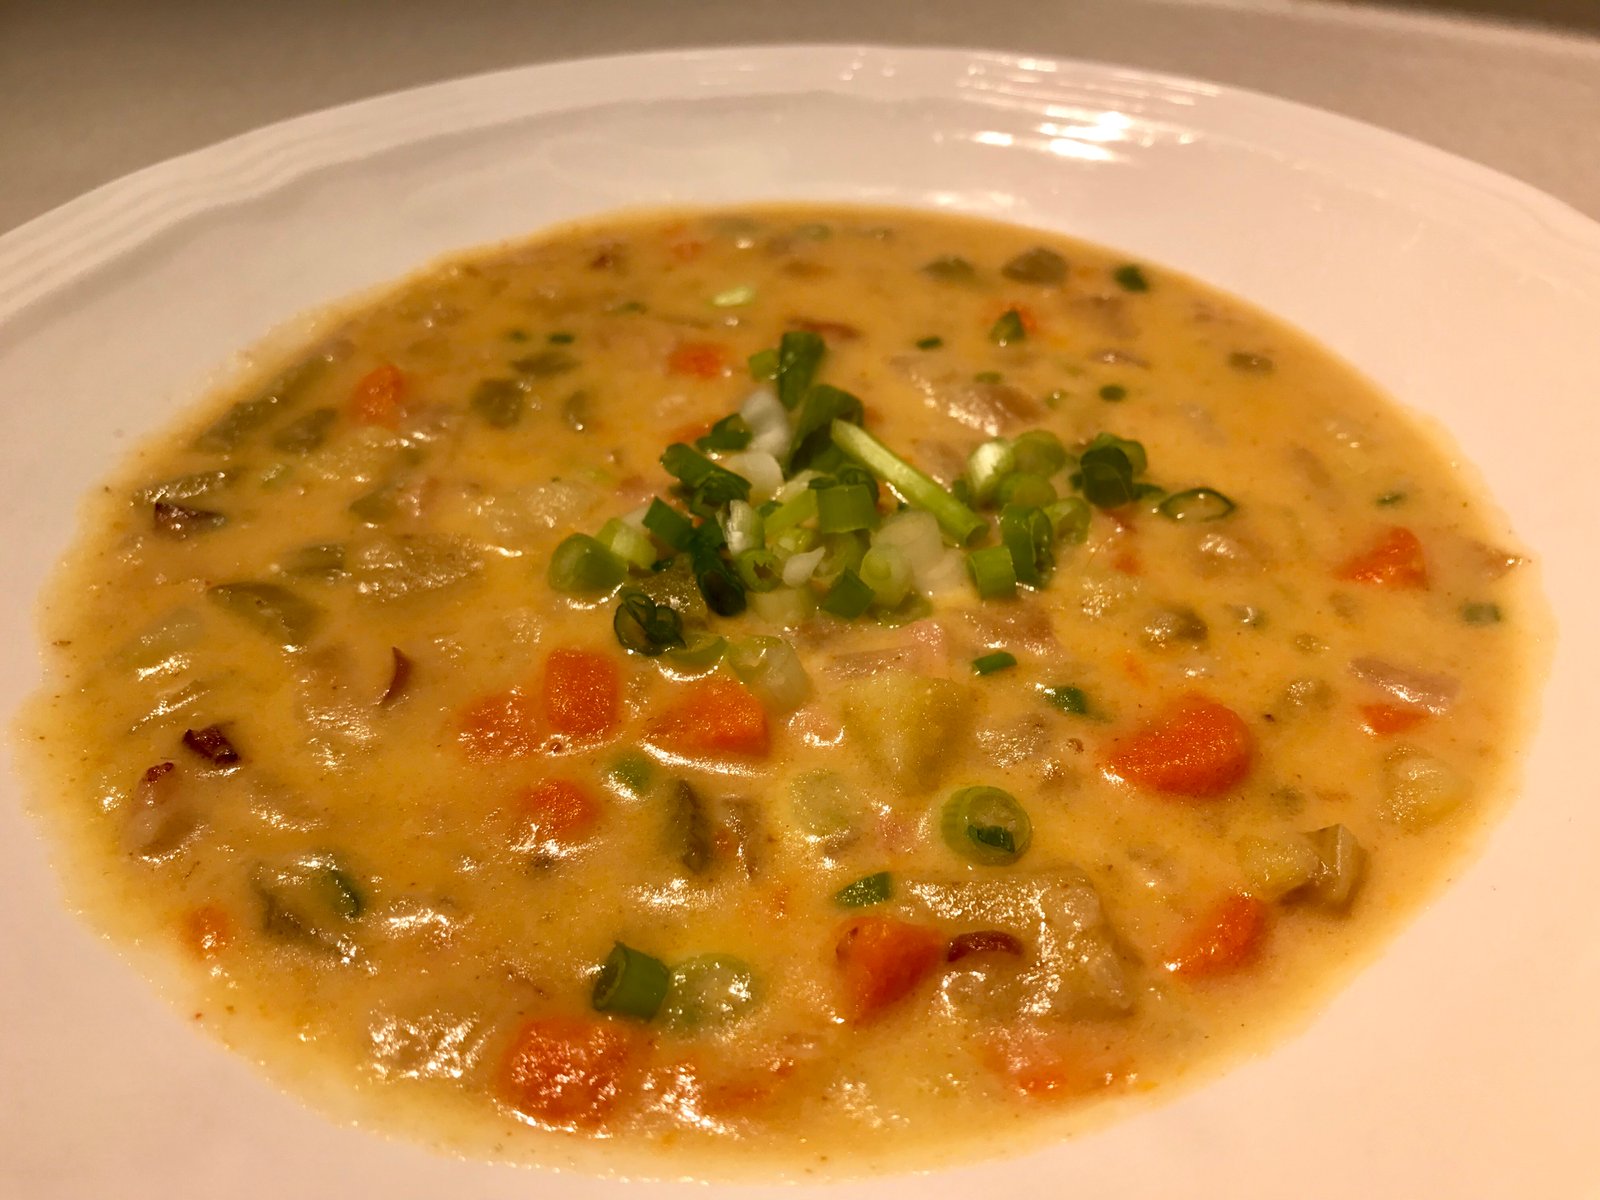
We love soup and we also try to eat healthy meals as often as possible.  Any opportunity to lighten up a favorite meal and still feel like we’re having a “cheat” meal is appreciated. This potato soup is bulked up with some flavorful vegetables and lightened up by using mostly broth instead of cream. Use good quality cheese to get the most flavor. Mild and sharp cheddar both have roughly the same calories but because sharp has a stronger flavor, you can use less and get maximum flavor for fewer calories. The same goes for using pecorino instead of parmesan. Also, I prefer to NOT use low-fat cheese in recipes. It doesn’t melt well, and the little bit of fat that is lost in reduced fat cheeses means that the cheese has less mouth feel which not only affects the overall taste, but will make the food less satisfying. You might be more likely to eat more food, meaning more calories! That said, for all the tricks that this soup uses, everyone will love it and no one will feel like they’re missing out.
Begin by dicing four ounces of Canadian bacon and cook in a large pot with one tablespoon of oil until the meat begins to get crispy.

Meanwhile finely dice a large red onion, three pealed carrots, and 3 stalks of celery.

Add the vegetables to the pot and cook until soft and lightly browned. Add one teaspoon each of dry mustard (Colman brand, of course) and garlic powder and half a teaspoon of smoked paprika. Cook for an additional minute.
Add three cups of chicken broth, one and a half pounds of diced Yukon gold potatoes (about 3 medium-sized), half a teaspoon of salt, and Cayenne pepper to taste (maybe a 1/4 teaspoon or so). Bring to a boil, reduce heat, and simmer, covered, for about 20 minutes until the potatoes are soft.

Remove the pot from heat. Using a spoon or wooden spatula mash about half of the vegetables and potatoes against the side of the pot to smash them and thicken the soup. Stir in 1 cup of half and half, 1 cup of shredded sharp cheddar cheese, and a quarter cup of pecorino Romano cheese. Pecorino is a sheep’s milk cheese that has a sharper flavor than parmesan. Stir until well combined and the cheeses are melted. Top the soup with some diced scallion as a garnish and enjoy! If this soup sounds good, click like and we’ll post more of our favorite soup recipes and don’t forget to sign up to get email notifications of all of our new posts.

Creamy Cheese Soup

  • 1 T olive oil
  • 4 oz Canadian bacon, diced
  • 1 large red onion, diced
  • 3 carrots, peeled and diced
  • 3 stalks of celery, diced
  • 1 t dry mustard powder
  • 1 t garlic powder
  • 1/2 t smoked paprika
  • 3 c chicken broth
  • 1 1/2 lbs Yukon gold potatoes, diced
  • 1/2 t salt
  • 1/4 t Cayenne pepper, more or less to taste
  • 1 c half and half
  • 1 c shredded sharp cheddar cheese
  • 1/4 c pecorino Romano cheese
  • 1/2 c scallion, diced

Heat oil in a large soup pot and cook bacon until the edges start to get crispy. Add onion, carrot, and celery and cook until the vegetables are soft and begin to brown.
Add spices and cook 1 additional minute.
Add broth, potatoes, salt, and Cayenne to pot and bring to a boil. Reduce heat and simmer, covered, for 20 minutes or until potatoes are soft.
Remove the pot from the heat. Smash about half of the vegetables and potatoes against the side of the pot with a fork or spatula to slightly thicken the soup.  Add half and half and cheeses. Stir until combined and cheese is melted. Divide into bowls and garnish with diced scallion.

Recipe of the Week – Chicken Tamale Pie

We love flavors inspired by Mexican food and while this tamale pie is far from an authentic dish, it is quick and easy, perfect for RV cooking on a day you need to cook inside and don’t mind firing up the oven.
Start by preparing the cornbread base: mix half of a gluten-free cornbread mix with half a cup of frozen or canned corn (drained), half a cup of Greek yogurt, and on egg.  The mixture will be dry and sticky. If it is too dry, add a little milk or half and half. Spread the mixture into a baking pan. Place into a 400º oven and bake for 15 minutes. It will not be golden and crispy and it should be set in the center, but not “done.”

While the cornbread mixture is in the oven, prepare the topping. On the stove top, sauté one large diced onion in olive oil until tender then add 2 cloves of minced garlic for another minute. Add one tablespoon (about half a packet) of taco seasoning, two cups of diced cooked chicken, and about half a cup of enchilada sauce. The chicken can be poached, grilled leftover from a previous meal, or a rotisserie chicken that has been shredded. It doesn’t even have to be chicken. We grilled pork chops the night before and made a couple of extras for this meal.

Take the cornbread out of the oven and poke holes in it with the handle of a wooden spoon. Pour about half a cup of enchilada sauce over the mixture, allowing the sauce to fill in the holes.

Top with the chicken mixture.

Cover the whole thing with a layer of shredded cheddar or Mexi-blend. If yours is as full as mine, place it on a cookie sheet or you will end up with a huge mess (I may speak from experience here)!

Bake for another twenty minutes, until bubbly and the cheese has toasted. Bubbly and toasted are two of my favorite cooking techniques!

Serve with guacamole, green salad, or eat it all by itself. Stay tuned in future weeks for more traditional recipes turned into casseroles for a quick and easy weeknight dinner. Leave a comment below with your favorite dinner casserole recipe, maybe we will feature it as one of our recipes of the week.

Chicken Tamale Pie

  • 1/2 package of gluten-free corn bread mix (we like Krusteaz brand)
  • 1/2 c plain Greek yogurt (sub sour cream if you prefer)
  • 1/2 corn kernels (frozen or drained canned)
  • 1 egg
  • 1 T olive oil
  • 1 large onion, diced
  • 2 cloves garlic, minced
  • 1 T taco seasoning (about 1/2 a packet)
  • 2 c diced chicken or pork, already cooked
  • 1 c enchilada sauce, divided (I buy the small-sized can and use the whole thing)
  • 1 cup of shredded cheddar cheese (or Mexi-cheese, or pepper jack, or whatever you have on hand)

Preheat the oven to 400º. Prepare the base by mixing cornbread mix, yogurt, corn, and egg in a bowl. The mixture will be dry but if it doesn’t come together, add a little milk or half and half. Spread the mixture into a 9×9 pan and bake for 15 minutes while you prepare the topping.
In a large skillet, heat oil and sauté the onion for about 5 minutes, until tender. Add garlic and cook one more minute. Add taco seasoning, 1/2 c sauce, and chicken. Cook until heated through.
Remove the cornbread from the oven. It will not be done but should be mostly set in the center. Poke holes throughout with the handle of a wooden spoon and top with the remaining enchilada sauce. Top with the chicken mixture and finally, the cheese.
Bake for another 20 minutes until bubbly and the cheese has melted and toasted.

Recipe of the Week – Cheesy Risotto

Today’s blog post starts with a picture of Pepe in front of the fireplace because he’s adorable and it brings us to our favorite fall thing… comfort food! Jessica Vu, swing dancer extraordinaire, teacher, and lovely friend, also happens to be an amazing cook! Her blog Purple Leopard Recipes has some wonderful gluten-free cooking and this Cheesy Risotto will make your never want for mac and cheese again.  While we were traveling through Wisconsin this summer, the cheese and sausages made me think of this recipe so I made some adjustments in honor of the Cheese State. I hope that Jessica approves!

Dice 6 oz of kielbasa, a red or sweet onion, and two cloves of garlic.

In a large pot, saute the sausage in 1 tablespoon of canola oil over medium high heat until it begins to get crispy. Don’t worry about the brown bits in the bottom of the pot, but don’t let them burn.

Add the onions and garlic and cook until soft.

Add one and a half cups of Arborio rice. Arborio is a short grained rice that is perfect for risotto because of its high starch content.  It has a creamy texture and yet remains firm when cooked for longer periods. Do not make risotto with other types of rice, you WILL be disappointed.
Risotto is notorious for home cooks because it needs to be watched non-stop. Now is the time to focus.  Toast the rice in the until some grains begin to pop. You will need 4 cups of chicken broth for the remainder of the cooking process. Put it in a sauce pan and warm it to the point of steaming, but not simmering. This will speed up the cooking process over using room temperature broth. Add broth 2/3 of a cup at a time, stirring frequently with a rubber spatula.
img_7376
Let the rice simmer until the liquid is absorbed. Run the rubber spatula down the center of the pan. If the rice runs back together, it is not time for more liquid.
[wpvideo YnXEOHaW ]
When the rice and broth stays in place, add another 2/3 cup of broth.
[wpvideo mbOujDAe]
Continue this process until you are down to the last 2/3 cup of broth. Rice will absorb moisture from the air. This means that some times you may need more broth than others depending on the relative humidity in your environment, the age of the rice, and other factors. Taste the rice to see if it is done. There should be a little bite and firmness to it, but you may want to add the last of the broth and cook longer. Our rice is kept in an airtight container and I pretty much always use all of the broth.
Remove the pan from the heat and add 1/2 cup of dry white wine or dry sherry.  You can leave this step out, but it does add some nice flavor. Stir until absorbed.
Next add 1 1/2 teaspoons of Coleman’s ground mustard (hello, of course it’s Coleman’s), 1/2 cup of FAGE 2% Greek Yogurt, and 1 cup of shredded cheddar cheese. Stir until everything is well incorporated, creamy, and melty (one of my favorite cooking techniques)!

Now to take things over the top, add two slices of plain old Velveeta cheese slices. Based on the name of the recipe, you didn’t think that this was going to be healthy did you? Add salt and pepper if needed.  I also like to stir in a little Crystal hot sauce.

Serve with something green so that you don’t feel bad for going in for seconds.  The recipe should serve 6, but good luck! I’ve doubled it and taken it to a carry-in in a crock pot and never come home with leftovers.

If you are lucky enough to have leftovers, it is very good reheated the next day, but try this instead: spoon about 1/2 cup into a frying pan with a little olive oil and press down with the back of a spatula.

Cook on medium heat for about 3-5 minutes and carefully flip to cook the other side until brown and crispy (my second favorite cooking technique when it comes to cheese).

Cheesy Risotto (Mock Mac & Cheese)

  • 4 C chicken broth (or one 32 oz carton), heat in a sauce pan until just steaming
  • 1/2 C dry white wine or dry sherry
  • 1 1⁄2 t Coleman’s ground mustard
  • 1 C shredded cheddar cheese
  • 1⁄2 C FAGE 2% Greek yogurt
  • 2 slices Velveeta cheese
  • 6 oz kielbasa
  • 1 T canola oil
  • 1 medium red or sweet onion, diced
  • 2 cloves garlic, crushed
  • 1 1⁄2 C Arborio rice
  • salt and pepper to taste
Over medium/high heat, fry the kielbasa until crisp in oil.
To the hot oil and sausage, add onion and garlic. Sauté for 3-4 minutes or until soft.
Add Arborio rice and stir until slightly toasted, just 1-2 minutes should do it.
Add 2/3 cup chicken broth. Gently stir and adjust heat to just a simmer, not boiling. Stir gently and frequently (at least once every two minutes).
When to add more broth: Run the rubber spatula down the center of the pan, making a trough. If the risotto runs back together, it is not ready for more broth yet. If the risotto does not run back together and the trough remains, add another 2/3 cup broth.
Keep adding broth in 2/3 cup increments every time the trough is ready, until you have just a bit of broth left (Making sure you are stirring gently and frequently).
Taste the risotto. Is it done to your liking? It should be soft yet firm to the bite. If not, add the remaining broth until the risotto is the tenderness you desire. If it is done, add the white wine and remove from the heat.
Stir until white wine is absorbed and mostly evaporated. (If this is taking too long, you can reintroduce the pan to the heat momentarily).
Add ground mustard, shredded cheese and yogurt. Stir until melty and creamy.
Add two slices of Velveeta. Stir until fully incorporated. Salt and pepper to taste.

Recipe of the Week – Taco Rice Salad

Taco Rice Salad has all the favor of tacos or nachos without the calories of chips or wraps. We enjoy it as a quick dinner or even leftover for lunch. It reminds us a little of the popular bowls at places like Hothead or Chipotle.
Start out mincing some garlic and tossing it a skillet with a pound of ground beef over medium high heat until browned. When it’s almost done add 1 cup of frozen corn kernels to thaw them out. If you are using fresh corn add it to the salad later. In a separate pot, make the yellow rice mix according to instructions. We use Zatarain’s Yellow Rice and Laura’s Lean Beef.
IMG_8020.JPG
Drain out the fat and add 3 cups of cooked yellow rice, 1 t each ground cumin and chili powder, and 1/4 t each salt and pepper (you may want to omit the salt, some of the rice mixes are pretty high in sodium). Let the whole mixture cool slightly.

On each plate, place about 1 1/2 cups of chopped romaine lettuce, 1/2 cup of chopped tomato, 1/4 cup of drained black beans, and a sprinkling of chopped red onion (also the corn if you’re using fresh).
IMG_4370.JPG
To make dressing combine 2/3 cup each of Greek yogurt and salsa with 1 t chili powder and 1/2 t ground cumin in a bowl.  We like Pace Salsa and Fage 2% Greek Yogurt.
IMG_3306
Spoon beef mixture over lettuce and top with Sargento shredded cheddar cheese and dressing. Serves 4-6 hungry people.
IMG_4238
Here’s the original recipe from myrecipes.com and here is my modified version:

Taco Rice Salad

Salad:

To prepare salad, heat a large nonstick skillet over medium-high heat. Add beef and garlic, and cook until browned, stirring to crumble. Add frozen corn (if using). Drain; return beef mixture to pan. Stir in rice, spices, and salt and pepper.  Cool slightly.

Layer lettuce, tomato, fresh corn( if using), onion, and beans on plates.

To prepare dressing, combine Greek yogurt, salsa, 1 teaspoon chili powder, and 1/2 teaspoon cumin, stirring with a whisk.
Top with 3/4 cup rice mixture, 1/3 cup of dressing, and about 1 1/2 tablespoons cheese.

 
Let us know what you think of this make at home version of your favorite restaurant bowl.

Rainy Day = Wine & Cheese Tastings

Sometimes we love to hike in the rain, other times we love to just hang out indoors, but most of the time we are off finding some local fun. When you are in the Finger Lakes region the best thing to do when it’s raining is find a few wineries. This is our third vacation in the Finger Lakes region so we have a few favorite wineries that we have been excited to visit for one reason or another. When we have the time, we like to visit our favorites while sprinkling in a few new wineries.
This day started with a favorite winery for us and one that is known for its port at Ports of New York in Ithaca. We keep coming back to this winery for a couple of reasons, the story of how the winery started and the delicious port wine! Frédéric Bouché has been making wine in New York for about 10 years. Every year we visit the winery we get to see it evolve and grow.
IMG_2072         IMG_2067
Next stop was the Lively Run Goat Dairy Farm, established in 1982. This was the most impressive stop of the day. It was new to us but we will definitely be back! The visit started with “playing” with the goats, chickens, and the horses while our cheese tasting was being prepared. We did a lot more talking to them than actually playing with them, but oh my goodness they were adorable!
IMG_2076    IMG_2079
As if that wasn’t enough fun, our cheese tasting was ready. For only $5 a person you get to taste 10 types of cheese and 2 jams. We also had a few more tastes of cheese and jam once she realized how much we loved cheese! LOL The cheese was really that good! The flavors were rich, creamy, and a good variety to meet everyone’s cheese needs!
When we were in Spain last summer, we fell in love with quince paste jelly (tastes a bit like combination of apple butter and pumpkin pie filling). We were pleasantly surprised when she had quince paste and quince jam!! Needless to say, we left with 4 packages of cheese and some quince paste.
55182230559__71F19A1C-35F0-4949-8CAB-E5B76C7EF2EE   IMG_2083
Next stop was another familiar winery. Lucas Vineyards has been in the Finger Lakes region since 1980. The founder, Ruth Lucas, not only started this family business but she also co-founded the Cayuga Wine Trail, noted as America’s first wine trail.
IMG_2086
Brian was in a hurry to get inside because it rained all. day. long! 🙁 Lucas Vineyards is a beautiful place to listen to great music on the patio on Thursday nights, meander through their shop, and of course, taste good wine! We purchased Lucas Blues, a blend of Seyval and Cayuga grapes, to enjoy on a summer evening. We also purchased a couple of sweet bottles for our sweet wine loving friends. The wine looks good, tastes good, and is reasonably priced – this is a trifecta for us! We really love the Nautie line for a nice gift with a bit of attitude!
img_2095.jpg
The last stop of the day was another new winery, J.R. Dill Winery. We stopped here because (1) they had wines that interested our taste buds,(2) they had a great view of Seneca Lake, (3) had a nice patio to enjoy their wine while looking at the lake.
IMG_2090
This was a great find! If you enjoy looking at the character of a winery, you will love this place. They had an antique bar back from an old soda fountain shop and sea glass collected by the owner in the bar, just to name a couple bits of the character in this shop.
There is usually more to enjoy in a winery than just wine, which is great for a person who doesn’t drink or is the designated driver but still wants enjoy the experience. J.R. Dill Winery had cheese and are you ready for this? Riesling Garlic Dill Pickles! If you love garlic and pickles, you will be in heaven with this combination! Your friends may not love your breath, but if that is the case, they are not real friends! LOL
IMG_2096
We ended our winery and cheese day with a nice glass of Cabernet Franc Rosé and a bit of cheese. I would love to show you the cheese but we inhaled it faster than I could take a picture. Now that is good cheese!
IMG_2091
We have just a couple more wineries to visit before our time comes to an end in Watkins Glen, NY., including Shalestone Winery who has the best tagline ever, “All we do is Reds!” Check out their website to read their philosophy. If you love them, you love us! 🙂
Want to read more blog posts from us? Make sure you sign up to get here to get email notifications. Like what we had to say? Leave a comment!

★ 25 years guiding ★ 48 U.S. states ★ 10 countries ★ 3,000+ Camino miles