IF Series, Part 6: Lessons Learned from Intermittent Fasting

Before I can start this post, you have to know I have been dreading this topic. In short: I am conflicted. I am questioning my decision to even talk about our lessons learned. I wonder who am I to talk about intermittent fasting (IF) when I haven’t lost weight? UGH. Who am I to talk about IF when most days I am just praying I am doing it “right.” UGH. Who cares what I have learned when I haven’t lost any weight. It’s taken me three weeks to write this post. It led to some bad eating days over the topic. Yet here I am persisting and that reflects the essence of who I am. I persist at everything. It doesn’t matter what the topic or activity, I persist. Ultimately through IF, I have learned a lot about myself, what makes me happy, and I have done significant healing. It may not have been what I wanted to learn two years ago when I started IF but I believe the lessons I’ve learned will stay with me forever. With that, let’s persist.

I’ve met a lot of diets I loathed within weeks of starting them, sometimes less. The thought of the cabbage soup diet still gives me nightmares. Counting points, counting calories, never eating carbs again, putting food in pre-portioned boxes, 3-day detox diets, and meal prepping, honestly, all give me a massive headache. I am not judging anyone else’s journey, this is about my journey and mine alone. Simply stated, I want to not eat and then eat without gaining weight. Guess what? That can happen with intermittent fasting (IF). There is magic in allowing your body time to rest between meals. If there was a magic pill for healthy living, one thing I know beyond a shadow of a doubt, intermittent fasting is that magic pill. Our bodies used to get a lot of rest when we only ate 2 or 3 meals a day, before the creation of the “snack” lifestyle. Thank you, Nabisco, and all the rest of you delicious snack companies (insert sarcasm). To give your body time to process, digest, and let go of food before you eat again, is one of the best gifts you can give your body. Most of the major religions practice fasting and it has been around since the beginning of time (for reasons we don’t need to worry about today). Brian and I have been practicing IF for two years and it has created the most freeing, most rewarding relationship we have ever had with food. We have learned a lot about IF and that’s what I am going to talk about today.

During our two years practicing IF, we did not start losing weight until we made more changes to our practice. I am confident that is in part because our bodies were healing from the inside out. It’s exciting to see how the outside is now changing. I will talk about what we are currently doing in my next and last blog post for this series. However, this series hasn’t been about weight loss but rather freedom from food and improving our overall health. We have learned a lot about our bodies over the last two years. Most importantly I needed to know if I could practice intermittent fasting forever before I depended on it for weight loss. But let’s get into what I have learned so far.

Lesson 1: Hormone Balance and Healing can Happen with IF I had a hysterectomy at 40 and though they didn’t take my ovaries, I was kicked into peri-menopause within the first year. First I developed hot flashes. I remember giving an important presentation while practically undressing because of my hot flashes. Teaching was another challenge, I was always either undressing or adding extra layers, quite inappropriate and ridiculous either way. 😂 I developed night sweats that would leave sweat stains on my sheets, horrible brain fog that made me think I was losing my mind, and then there were my mood swings. Holy cow was I moody, just ask Brian! I was taking progesterone and all that did was help me gain weight. Before I started IF, I was a hormonal mess. It took about 6 months on IF before I realized that my hot flashes were gone and my night sweats were over, never to be seen again! 🙌🏼 I didn’t stop taking my progesterone until late last year and I should have stopped earlier because my mood is a million times better without taking anything. I turn 50 this year and my hormones are more under control than they ever have been in my entire life. I don’t know if menopause will get worse before I am through it but I am symptom-free and feel amazing. I know it is because of practicing IF because that is the only change I made two years ago.

Not only have my hormones become better balanced, but my inflammation and arthritis pain are gone. My inflammation flairs up when I am consuming too much wine, but overall, since I started IF, I have seen a lot less inflammation. I had terrible arthritis in my hands from too much computer work but the pain has been gone for about a year. Brian’s back and joint pain have also been greatly reduced and we have both lowered our prescription medication doses with our doctors’ guidance. If you decide to start practicing IF, see your doctor. My doctor has been along with me throughout this entire journey and she can tell you just how much healing my body has since over the last two years.

Since the start of 2021, as I said, we have made more changes and improved the consistency in our IF practice. We also took a break from alcohol. We are currently on week 7 of 12 weeks without alcohol (though we did indulge on Valentine’s Day with a nice bottle of red wine). With the addition of our changes the one health issue that persisted has healed – my blood pressure. I have struggled with high blood pressure for about four years and as of this week, I have stopped taking my blood pressure medication. It will continue to be monitored for a long while but I am thrilled to see my blood pressure self-regulate. That single “fix” is all the motivation I needed to write this blog post.

Lesson 2: Release from Food Addiction & Improved Food Digestion This is an interesting lesson because I think I will always be a food addict but I definitely have a better handle on what I eat, when I eat, and determining what foods are “window worthy,” which means determining if a food is worth eating in the smaller window I have open for feasting. I decide what I want to eat and I don’t feel guilty because my food choice isn’t on “the diet” because there is no “diet.” When guilt is gone, food tastes better and decisions about what to eat become easier. This is still not a perfect practice but I am not striving for a perfect “diet” but rather a healthy relationship with food. I’m getting there.

The changes I needed to make were bigger than just what I ate, I needed to stop eating so often because my digestive system was a wreck. I stopped eating gluten in January 2013 and that helped my digestion quite a bit but I still had struggles. I was in the emergency room three times between 2015-2018 because of digestive problems. The only thing that worked to eliminate the problems was to have a clear liquid diet for 24-48 hours. When I did that, my digestive system settled down. When I found IF, I knew the thought of not eating for a small time period would be perfect for me. And it was! I haven’t been to the ER for digestive issues since I started IF in late January 2019. My digestive system is still sensitive but I don’t have near the problems I used to have with it and it only gets better with time. ❤️

Lesson 3: Control over Weight Fluctuations & Hunger Signals I am thrilled that yo-yo dieting is gone forever. I still can’t believe we haven’t had any significant weight fluctuations since we started IF. We have gained some weight during a vacation or a week of too much wine, too long of an eating window, etc. but it comes off so easy once we pull back on the food/wine and tighten up our eating window. If you’re a skinny person or don’t have a food addiction, you understand the ebb and flow of small weight changes. I never understood this phenomenon. I have always been either losing a significant amount of weight because of a diet I was on or gaining weight because of hormones and overeating. I have never experienced the middle without huge ups and downs until I started practicing IF. A lot of people lose significant weight practicing IF. I have not lost a lot of weight yet but I know that my body needed to heal on the inside first and I needed to be ok with living at my current weight. Honestly, I needed to trust IF wouldn’t fail me if I ate burgers, pizza, and drank wine which are the normal “forbidden foods” on a diet that cause people to gain weight when they go off the diet.

After I read Bert Herring’s, The Power of Appetite Correction, I realized how wrong the myths we believed about being hangry were and how hunger comes in waves. Did you know that you don’t have to eat when your stomach rumbles? Before IF, I thought I always had to eat when my stomach rumbled or I’d get hangry. Hunger isn’t constant but rather a wave that will dissipate if you ignore it. My stomach rumbles and now I understand I don’t need to react to it. Sometimes our bodies make noises but it doesn’t mean they need immediate attention. I highly recommend reading Herring’s book to gain control over hunger signals.

Lesson 4: Learning to Love Exercise Again You don’t lose weight in the gym but you can love taking care of your body – this took me several years to understand. I want my body to move and move well for a long time to come. I want to hike the Camino and climb big mountains for the rest of my life and that means I have to keep my body moving throughout the entire year. I don’t consider exercise to be riding my bike around a town, walking the Camino, or hiking outdoors, those are just part of what I enjoy doing for fun. I spent a long time loathing the gym and going anyway to finally creating an exercise/meditation space at home that makes me smile and welcomes me in without judgment. This space has helped me learn to love exercising and taking care of myself again. My home gym is my private space. I can go when I want, for how long I want, or I don’t have to go. Now, I love hopping on my treadmill to break up my day, getting in a workout to clear my mind, and I even occasionally enjoy lifting weights. Nobody cares how loud and off-key I sing or what show I am watching on TV, and that helped me learn to love exercising again. When I can’t climb a mountain or bike under the warm sun, I can still keep moving because I want to do it.

Lesson 5: Trusting the Process This is a tough one and a lesson I am still learning. I am still trying to stop punishing myself for weight problems. I know that food is no longer the enemy and neither is wine. I don’t know why my weight loss is so much harder than what it is for others except I am a life-long diet and metabolism abuser. From everything I read, those are the people that have it the worst when it comes to losing weight. Also, I am going through menopause and my body needs my patience. For those reasons, I have faith in the process. If I am at this weight for the rest of my life, I will be ok. As long as I can remain active, I am ok. If I lose weight, I am ok with that too! Gin Stephens, the author of several books including her most recent, Fast, Feast, Repeat, always says that people come to IF for the weight loss but stay for the health benefits. I came for the weight loss, didn’t lose much but regained my health and now I am staying for the weight loss. I always have to do things the more complicated way. 😂

Lesson 6: Change is Good What is the definition of crazy? Doing the same thing over and over again expecting different results. I have been dieting my entire life. It has never worked for a lifetime. It was time for a big change. It wasn’t time to lose weight but rather to stop making the same decisions over and over again expecting different results. It was time to heal. IF has allowed for change, healing, and self-discovery but only because two years ago I was all in for the unknown process, the unknown journey of intermittent fasting. I was more than ready for change and I was over dieting forever. In 2021, I am still ready for change but to say I am still practicing the same “diet” for more than two years is a miracle. I have never stuck around for the same diet for this long. I know why too – because it’s not about what I eat but rather when I eat. Hallelujah!

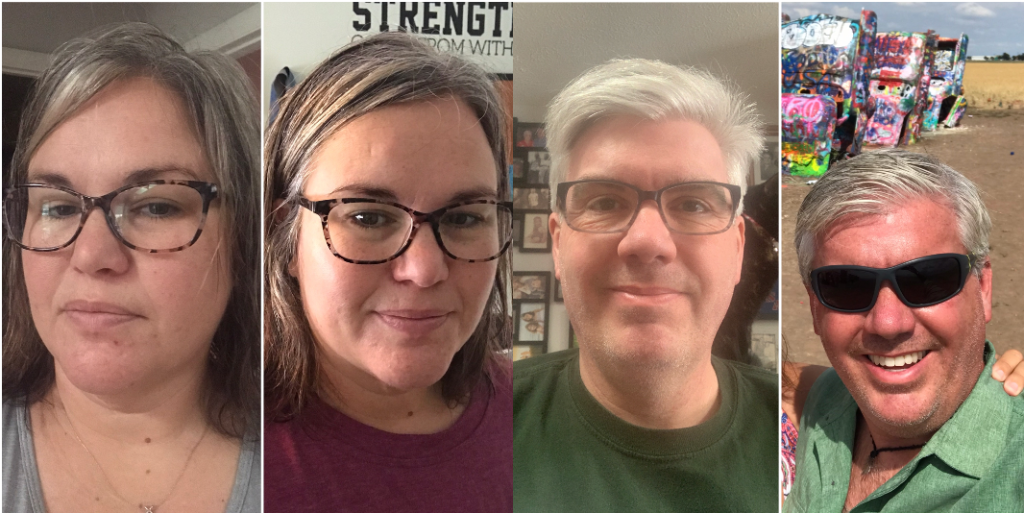
In the final blog post of this series, I am going to talk about what our eating/fasting regimen has looked like for the last two years and the changes we have made for 2021. I am not going to say that those changes are the reason we are losing weight but they sure have motivated us! Here are a few pictures that keep us going! The photo on the far left is January 6, 2021, the next is February 6, 2021. For Brian, the left photo is February 21, 2021, and the right is July 30, 2020. It’s time this weight loss train moved into high gear and we are loving it! Come back for the next blog and I will tell you all about it!

Just look at the changes in our face since we made changes to our IF practice in 2021!

To go back and re-read post #5 in this series, click here. To go back and re-read this series from the start, click here. To read the final post in this series, come back! Subscribe to our blog to get an email when the blog is posted.


*We are a participant in the Amazon Services LLC Associates Program, an affiliate advertising program designed to provide a means for us to earn fees by linking to Amazon.com and affiliated sites.

Recipe of the Month – Mexican Chicken Soup

Yep, you read that correctly, the recipe of the week is becoming the recipe of the month so that we can focus on bringing you more content in other areas, such as Camino planning and recaps of some of our best previous adventures.

With all of the cold weather we have been having lately, I’ve been making lots of soup. It not only warms the stomach but also the house! I love this recipe but it’s not ours, we have to thank Laurie (one of Michelle’s colleagues) who found the recipe on Cooks Country. On a side note and a fun fact we learned that Laurie has diligently subscribed to Cooking Light magazine since its inception 40 years ago and was one of their first subscribers! The soup has just enough kick to warm you up on multiple fronts. Of course, you could adjust the spicy heat up or down depending on your preferences.

Begin by bringing six cups of chicken broth to a simmer in a large pot and add about a pound and a half of chicken thighs to poach for 15 minutes.

In a food processor, combine half of a large onion, a can of diced tomatoes (or Ro-tel tomatoes with you like things on the spicy side), half (or more) of a seeded jalapeno pepper, four cloves of garlic, one canned chipotle chili and a tablespoon of the adobo sauce it’s packed in, and a teaspoon each of salt, pepper, and cilantro. Pulse the whole thing until it is smooth and well pureed. If I had any tortilla chips in the house this is probably as far as I would have gone because it looked and tasted like a smooth salsa at this point.

Remove the chicken from the pot and set aside to cool. Pour the broth into a container to skim the fat off the top.

In the same pot, heat a tablespoon of oil and add the “salsa” to the pot. Let it simmer for five minutes or so to cook the “green-ness” out of it and allow the flavors to combine.

Skim the fat off the broth and add it back into the pot along with two cups of frozen corn and a can of rinsed and drained tri-blend beans (or kidney, pinto, or black beans). Allow the soup to come to a boil and then reduce the heat. Simmer for 15 minutes. Meanwhile, run a knife through the chicken to cut it into bite-sized pieces. Take the pot off the heat and add the chicken and two tablespoons of lime juice. Taste and adjust seasonings if needed (I added a little more salt).

Top the soup with diced avocado, slices of fresh or crispy tortilla, or a little cojita or queso fresco. We served it with pao de queijo, which are amazing gluten-free cheese rolls.

Mexican Cheese Soup

  • 6 c chicken broth
  • 1 1/2 pounds chicken thighs
  • 1/2 of a large onion
  • 1 t each salt, pepper, and cilantro
  • 1 can of diced tomatoes (get the kind with chilis or jalapeno if you like)
  • 1/2 jalapeno pepper, seeded
  • 4 cloves garlic
  • 1 canned chipotle pepper plus 1 T adobo sauce it’s packed in
  • 1 T oil
  • 2 c frozen corn
  • 1 can beans, any variety, drained and rinsed
  • 2 T lime juice
  • assorted toppings such as diced avocado, Mexican cheese, or tortilla strips

Bring chicken broth to a boil and add chicken. Simmer for 15 minutes until the chicken is done and there is no pink remaining.

In a food processor, combine onion, spices, tomatoes, garlic, and peppers and pulse until smooth.

Remove chicken from pot and set aside to cool. Pour broth into another container to skim fat once cooled. In the same pot, heat the oil and add the tomato mixture. Simmer for 15 minutes over medium heat to combine flavors.

After skimming fat from broth, add back to the pot along with the corn and beans. Bring to a simmer and cook for 15 minutes. Shred the chicken and add to the pot at the end of cooking along with the lime juice. Adjust seasonings if needed.

Let us know if you try this recipe or any other recipe we have posted! Tag us on Facebook or Instagram with the hashtag #cruisinwiththecolemans! We’d love to hear from you!

Recipe of the Week – Polenta Lasagna

When living a gluten-free lifestyle, whether by choice or necessity, there are many foods that you assume you may never be able to eat again. While restaurants have become more knowledgeable about gluten-free options over the last five years, it is still common to be offered a salad or a burger with no bun as the only option on a “gluten-friendly” menu. Most grocery stores have progressively stocked a variety of manufacturers but the choices are limited. You have to go to a specialty or high-end stores if you want choices.

Some foods are a real rarity in the gluten-free marketplace. Lasagne noodles are one of them. Gluten-free noodles range from “you can’t tell the difference” to “cardboard or sticks” and aside from penne, spaghetti, and elbows, there are virtually no other pasta shapes readily available so we adapt and improvise.

This polenta lasagne came out of one such improvisation. If you don’t know polenta, it is the Italian version of ground cornmeal, fancy grits, if you will. You can find it in several different spots in the store. There is often a fancy imported variety in the Italian aisle that runs about $10 a pound, but if you look in the aisle with breakfast grains like oatmeal you can find both grits and polenta for under $4 a pound. There two different types, a fine white corn or hominy meal often marketed as grits and coarser yellow corn meal which is more commonly marketed as polenta. There is a slight difference in flavor but they are basically interchangeable (as long as you’re not cooking for food snobs). When you chill cooked polenta (or grits) it turns into a solid cake-like mass that can be cut into slices and used in a variety of ways (try it on the grill with some olive oil, salt, pepper, and parmesan). We love Bob’s Red Mill brand.

For the lasagna, cook the grits at least an hour before you plan to assemble the lasagna but the night before is even better. In a saucepan, heat two and a half cups of half and half and two and a half cups of chicken broth to a simmer. Turn down the heat and add half a teaspoon of salt and slowly whisk in one and a quarter cups of polenta. The polenta is likely to lump together, so make sure that the liquid is moving when you add it and keep stirring with the whisk until it is fully incorporated. Cook on low for about fifteen minutes until the liquid is fully absorbed and the polenta is smooth and creamy. Stir frequently to keep it from sticking to the bottom and scorching. Remove from the heat, add half a cup of grated parmesan cheese, and stir well to incorporate. Let the polenta cool slightly while you prepare the pan.

Cut a piece of parchment paper about four inches longer than your 9×9 brownie pan. Fold the edges over so the paper will lay in the bottom of the pan and crease the corners to make a liner. Pour the still hot polenta into the pan and use a spatula to spread it evenly. Cover with plastic wrap pressed down onto the surface of the polenta, otherwise, it will get a rubbery skin on the top, and place in the refrigerator to cool for at least one hour, but overnight is better.

In a sauté pan, brown one pound of Italian sausage with the casings removed. While it is cooking remove the polenta from the pan. Using a long serrated knife, cut the polenta in half, making what are essentially two large lasagna noodles.

In the same pan the polenta cooled in, pour about half a cup of marinara and place one piece of polenta on top.

Add the rest of the marinara sauce to the sausage. Now layer just as you would a traditional lasagna. I don’t use a layer of ricotta because the polenta is already pretty creamy once reheated. Pour half of the meat mixture over polenta and top with a half cup of mozzarella cheese. Top with the second slice of polenta, the rest of the meat mixture and the remaining cup and a half of cheese.

Place the pan on a foil lined cookie sheet because it will bubble over, and place in a 350º oven for one hour. Cut into nine servings and serve with a healthy salad and some Chianti.

Polenta Lasagna

  • 2 1/2 cups half and half
  • 2 1/2 cups chicken broth
  • 1/2 t salt
  • 1 1/4 cup polenta
  • 1/2 c grated parmesan
  • 1 lb Italian sausage, casings removed
  • 1 jar of marinara sauce (or your favorite spaghetti sauce)
  • 2 cups shredded mozzarella cheese

Bring broth and half and half to a simmer. Add salt and whisk in polenta. Cook for 15 minutes, stirring frequently to keep from sticking or scorching. Remove from heat and stir in parmesan cheese.

Line a 9×9 pan with parchment paper and spread polenta all the way into the edges. Cover with plastic wrap and cool overnight or at least one hour in the refrigerator.

Once cooled and very firm, slice polenta into two sheets with a long serrated knife.

Remove casings from sausage and brown in a sauté pan. Pour 1/2 cup of marinara sauce into the same pan the polenta cooled in and add the remaining sauce to the sausage. In the pan, layer one slice of polenta, half the sausage mixture, and 1/2 cup of mozzarella cheese. Top with the second slice of polenta, remaining sauce, and remaining cheese.

Place the pan on a lined cookie sheet and bake at 350º for one hour. Makes 9 servings.

Recipe of the Week – Grilled Sausages with Potatoes, Shallot, and Spinach

Sometimes after a big day out exploring we just don’t feel like spending a lot of time cooking. That was the case after our day exploring Cape Coral. After visiting the fantastic Cape Coral Farmer’s Market, we did an eight-mile walk around town and found a great little Italian place for lunch that served gluten-free pizza. A visit to Wicked Dolphin Distillery and pool time back at the campground with some newly invented cocktails finished up our day.

By the time we got back to CC we were exhausted and starving. Here’s a quick dinner that you can throw together in no time at all with things that you might even have on hand.

Start out with a variety of potatoes: red, russet, and Yukon gold are my favorites. Dice them up into bite-sized pieces along with a couple of shallots and put into a microwave safe bowl.

Add about a tablespoon of olive oil and a good sprinkle of salt, garlic powder, and pepper. Cook in the microwave for five minutes or so until the potatoes are mostly cooked but still firm.

While the potatoes are cooking, get the grill heated up and add Italian sausages.

When the sausages almost done, add the potatoes and shallot mixture to the grill. BE CAREFUL to not pour the collected oil and water in the bottom of the bowl onto the grill or you will have some major flareup!

Cook the potatoes and sausage until they are nicely charred. Once they’re done, add a few handfuls of spinach and allow it to wilt for a second before removing everything from the grill and dividing between plates. Sprinkle with a little parmesan cheese.

I would highly recommend making sure that you have plenty light on the grill. We had to keep the lights off because of the no-see-ums and I might have burned things a bit! Also, you might notice that I didn’t use spinach… we couldn’t find any at the farmers market that morning so we just went without.

Grilled Sausages with Potatoes, Shallot, and Spinach

  • 1-2 Italian sausages per person
  • 1 lb of assorted potatoes, such as russet, red, and Yukon gold\
  • 2 shallots
  • 1 T olive oil
  • 1/2 t each salt, garlic powder, and pepper
  • 1 cup spinach leaves
  • 1-2 T parmesan cheese

Cut potatoes and shallots into bite-sized pieces and place into a microwave safe bowl. Top with oil and seasonings and stir to mix. Cook for 4-5 minutes in microwave until almost cooked.

Heat grill and add sausages. Cook for 6-8 minutes and turn. Add the potato-shallot mixture and continue to cook until charred to your liking, another 5-10 minutes, making sure that the sausages are cooked through. Add spinach on top and let wilt then remove to plates.

Sprinkle with parmesan cheese and enjoy!

Recipe of the Week – Potato Fennel Hash

While we were in Michigan this summer we took a fishing charter on Lake Superior and came home with a mess of fish. You’ll hear about our fishing adventure on Wednesday’s post but today you will see the fruits of our labor. We love to serve fish with Potato Fennel Hash but it actually goes well with any meat.
Fennel, also sometimes called Anise (ah-nees), is a bulb vegetable similar to celery but with a mild licorice flavor. The fronds have a stronger flavor can be dried or used fresh anywhere you would use dill. The stalks can be diced and added to salad for a spicy crunch. The bulb adds a nice flavor to potatoes and bulks the dish up with half the calories and carbs.
Begin by heating the oven to 450º. Place a heavy pan in the oven with a little oil to preheat with the oven. Trim the stalks and fronds and save for another use. Slice the bulb in half and remove the core. Slice the bulb finely to match size of the shredded potatoes. The slicing side of a box grater works well.

Slice a sweet onion into thin slices also.

Add about a pound of grated potatoes and mix all together so that they are well combined. The onions and fennel should be roughly the same texture as the potatoes. We often use bagged grated potatoes for convenience.

Heat a large skillet over medium high heat and add about one tablespoon of canola oil. Add about half of the potato mixture to the pan and sprinkle with salt and pepper. Don’t overcrowd the pan, you want the moisture to evaporate away while the potatoes get brown and crunchy.

After a couple of minutes, stir the mixture to allow the potatoes to cook evenly.

Once they are mostly cooked through, put the mixture into the pan from the oven. The hash should sizzle when it hits the pan. Place the pan back in the oven and repeat the process with the rest of the potato mixture.

Once all of the potatoes are in the oven, allow to brown and continue cooking while you prepare the meat, stirring occasionally.

I pan-fried our fish this night. It’s lake trout in a buttermilk cornmeal breading with cajun seasoning. The tartar sauce is homemade too! What do you love to serve with your fish fry? Post ideas in the comments below!

Potato Fennel Hash

  • 1 large fennel bulb, trimmed, cored, and thinly sliced
  • 1 large sweet onion, thinly sliced
  • 2 medium-sized russet potatoes, grated, with or without the peels
  • 2 1/2 T canola oil, divided
  • salt and pepper to taste

Pre-heat the oven to 450º with a heavy pan with 1/2 T oil in the oven.
Thinly slice the fennel and onion and mix with the grated potatoes. All three ingredients should be roughly the same sized shred.
Heat a heavy skillet over medium high heat. Add 1 T of oil and once hot, add half of potato mixture. Sprinkle with salt and pepper. Cook, stirring occasionally until most of the moisture has evaporated and the fennel and onion are cooked through.
Transfer the hash to the hot pan in the oven and repeat the process with the remaining potato mixture.
Allow the hash to brown in the oven, stirring occasionally, while you prepare the rest of dinner.

Recipe of the Week – Creamy Cheese Soup

We love soup and we also try to eat healthy meals as often as possible.  Any opportunity to lighten up a favorite meal and still feel like we’re having a “cheat” meal is appreciated. This potato soup is bulked up with some flavorful vegetables and lightened up by using mostly broth instead of cream. Use good quality cheese to get the most flavor. Mild and sharp cheddar both have roughly the same calories but because sharp has a stronger flavor, you can use less and get maximum flavor for fewer calories. The same goes for using pecorino instead of parmesan. Also, I prefer to NOT use low-fat cheese in recipes. It doesn’t melt well, and the little bit of fat that is lost in reduced fat cheeses means that the cheese has less mouth feel which not only affects the overall taste, but will make the food less satisfying. You might be more likely to eat more food, meaning more calories! That said, for all the tricks that this soup uses, everyone will love it and no one will feel like they’re missing out.
Begin by dicing four ounces of Canadian bacon and cook in a large pot with one tablespoon of oil until the meat begins to get crispy.

Meanwhile finely dice a large red onion, three pealed carrots, and 3 stalks of celery.

Add the vegetables to the pot and cook until soft and lightly browned. Add one teaspoon each of dry mustard (Colman brand, of course) and garlic powder and half a teaspoon of smoked paprika. Cook for an additional minute.
Add three cups of chicken broth, one and a half pounds of diced Yukon gold potatoes (about 3 medium-sized), half a teaspoon of salt, and Cayenne pepper to taste (maybe a 1/4 teaspoon or so). Bring to a boil, reduce heat, and simmer, covered, for about 20 minutes until the potatoes are soft.

Remove the pot from heat. Using a spoon or wooden spatula mash about half of the vegetables and potatoes against the side of the pot to smash them and thicken the soup. Stir in 1 cup of half and half, 1 cup of shredded sharp cheddar cheese, and a quarter cup of pecorino Romano cheese. Pecorino is a sheep’s milk cheese that has a sharper flavor than parmesan. Stir until well combined and the cheeses are melted. Top the soup with some diced scallion as a garnish and enjoy! If this soup sounds good, click like and we’ll post more of our favorite soup recipes and don’t forget to sign up to get email notifications of all of our new posts.

Creamy Cheese Soup

  • 1 T olive oil
  • 4 oz Canadian bacon, diced
  • 1 large red onion, diced
  • 3 carrots, peeled and diced
  • 3 stalks of celery, diced
  • 1 t dry mustard powder
  • 1 t garlic powder
  • 1/2 t smoked paprika
  • 3 c chicken broth
  • 1 1/2 lbs Yukon gold potatoes, diced
  • 1/2 t salt
  • 1/4 t Cayenne pepper, more or less to taste
  • 1 c half and half
  • 1 c shredded sharp cheddar cheese
  • 1/4 c pecorino Romano cheese
  • 1/2 c scallion, diced

Heat oil in a large soup pot and cook bacon until the edges start to get crispy. Add onion, carrot, and celery and cook until the vegetables are soft and begin to brown.
Add spices and cook 1 additional minute.
Add broth, potatoes, salt, and Cayenne to pot and bring to a boil. Reduce heat and simmer, covered, for 20 minutes or until potatoes are soft.
Remove the pot from the heat. Smash about half of the vegetables and potatoes against the side of the pot with a fork or spatula to slightly thicken the soup.  Add half and half and cheeses. Stir until combined and cheese is melted. Divide into bowls and garnish with diced scallion.

Recipe of the Week – One Pan Jambalaya

We made a decision when we were tent campers that we did not want to create lots of trash so we always use real plates, silverware, and cups to reduce our footprint just a little.  Whether you are in a tent or RV, washing dishes is a big bummer so one pot meals are always helpful, especially when we are dry camping.  We love this Jambalaya, though it gets toned down a little since Michelle is not a big fan of too much spice.  The recipe calls for some time savers such as precooked rice and frozen onion and pepper but we usually use fresh ingredients.
Start out by chopping a small white onion, bell pepper and about 6 oz of andouille sausage.  Meanwhile cook rice according to package directions (1 cup of rice to 2 cups of liquid will yield about 3-4 cups of rice needed for this recipe).
IMG_7155
Heat a tablespoon oil in a pot, add onion, pepper, and sausage, and sauté until veggies are soft and meat begins to brown.
IMG_9715
Dice 12 oz of chicken breast and add it to the pot, cooking until the chicken is lightly browned.
IMG_1023
Add 2 cans of diced tomatoes, 2 teaspoons of Tony Chachere’s Cajun Seasoning (we only use about 1/2 teaspoon), and the rice to the pot. Cover, reduce heat to medium, and let simmer until liquid is absorbed.  If you really want a one pot dish, add the rice and liquid together before the tomatoes and simmer about 20 minutes then add tomatoes.
IMG_3109
 
IMG_8580
Divide into bowls and top with green onions.  Add some Crystal hot sauce as desired to give some more heat!
IMG_5823
I made several changes to the original recipe from Cooking Light to help tone down the heat a little, but you may want to check out the original.  Here’s my version:

One Pan Jambalaya

Chop onion, pepper, and sausage. Heat canola oil in a large skillet over medium-high. Add onion mixture and sausage. Cook until vegetables are tender, stirring occasionally. Add chicken, cooking until lightly browned, stirring occasionally.

Add rice and 2 cups of water and cajon seasoning to pot. Cover, reduce heat to medium and simmer 15 minutes or until liquid is absorbed. Add tomatoes, cover again and simmer 10 minutes, stirring occasionally. Remove pan from heat.
Divide rice mixture evenly among 4 bowls. sprinkle with green onions and serve with lemon wedges and hot sauce, if desired.
Let us know how hot you like your jambalaya in the comments.

★ 25 years guiding ★ 48 U.S. states ★ 10 countries ★ 3,000+ Camino miles