Recipe of the Week – Savory Bacon Cheddar Biscuits

Some mornings we eat a quick breakfast so that we can get out on the trail, the water, or off to whatever adventure awaits, but other days we like to move a little slower and cook a good breakfast.  This biscuit recipe is on the side of King Arthur Gluten Free All-Purpose Baking Mix and with a few minor modifications, it has become one of our all-time favorite breakfasts!
Preheat the oven to 400º.
IMG_0863
Combine 2 ¼ c King Arthur Flour Gluten Free All-Purpose Baking Mix, 1 c thick shredded Sargento sharp cheddar cheese, ½ c Hormel bacon pieces, ¼ c sliced green onions, and ½ t garlic powder. I also love to use about 2 T minced garlic chives in place of the green onions when I have them.  In a pinch, 1 T dried chives will work.
IMG_8119
Pour 1 c half and half over the top and break 2 large eggs into the bowl.  Mix everything together until a soft dough forms.  Unlike traditional biscuits, don’t worry about over mixing, the more you mix, the better the flour will absorb the liquid.
IMG_1172
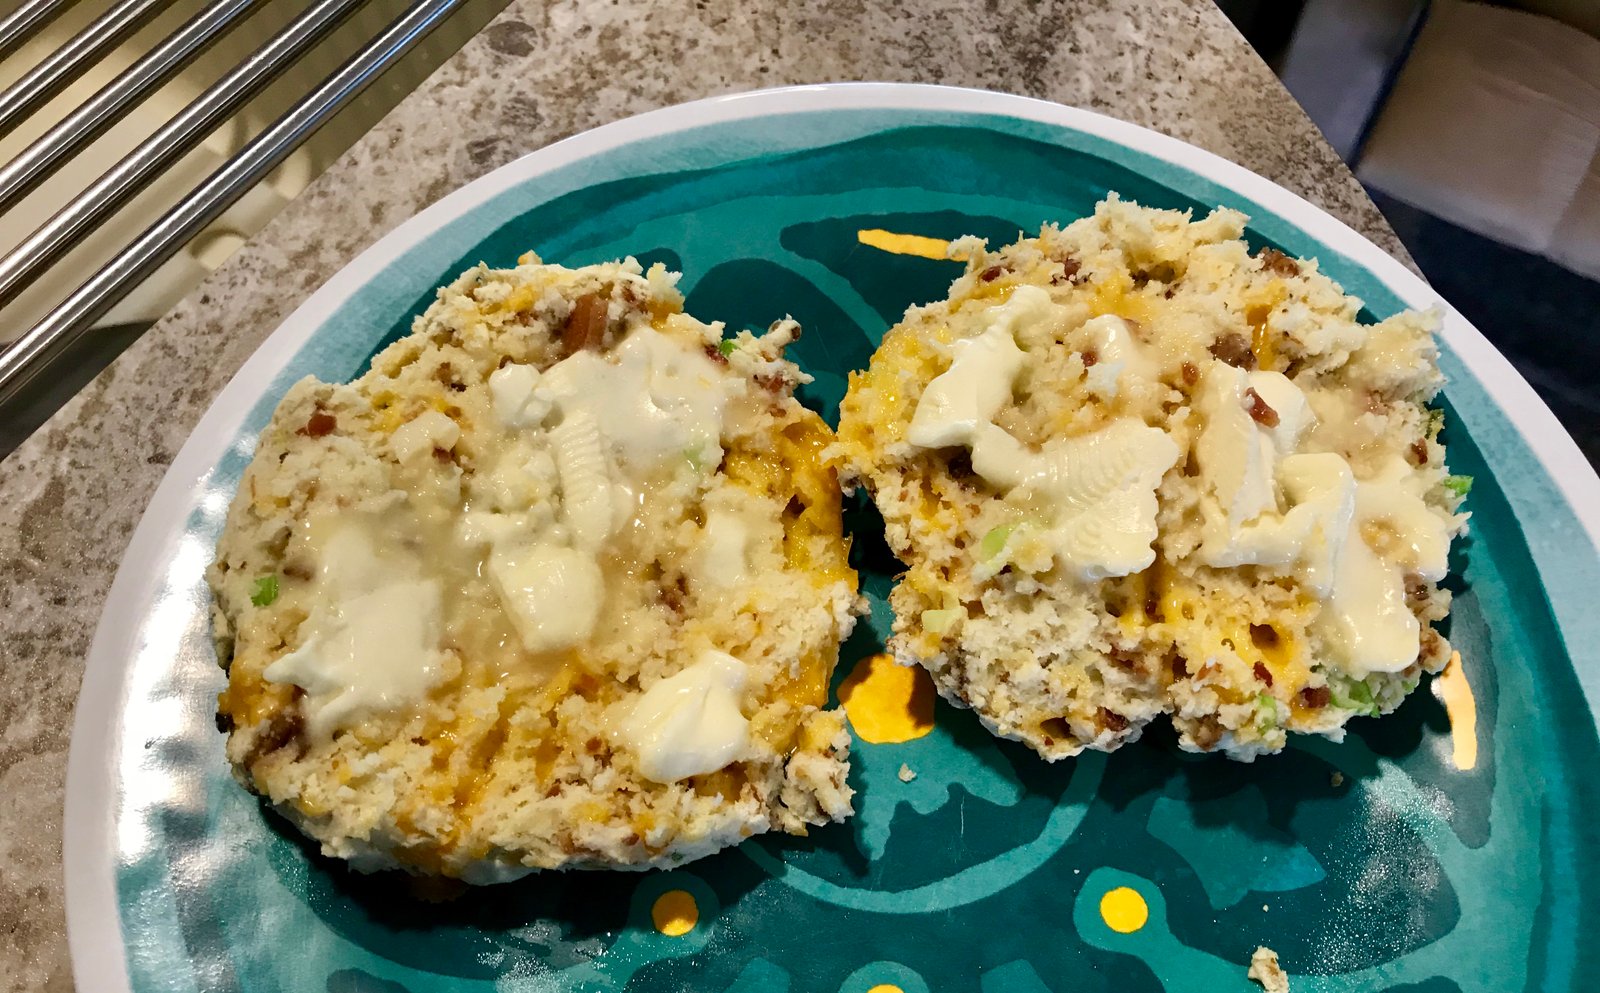
Spoon heaps of dough onto a baking sheet sprayed with cooking spray to make 6-8 biscuits.  Pat each biscuit down until it’s about 1 inch thick.  If they are too thick, they do not bake as well in the center.
IMG_6272
Bake in the oven for 15-18 minutes until golden brown and let cool 10 minutes.  Serve warm with butter.  When baking any gluten free item, the cook time is often longer than flour counterparts.  You cannot always rely on the visual appearance because they may not brown as you would expect, and the center will seem too wet if you use a toothpick to test it. This is why the cooling time is really important with any gluten free baked goods.  This setting time allows the biscuit to get crunchy on the outside and lets the starches set in the center giving a texture more like a traditional flour biscuit.
IMG_3897
We love these the next day with a scrambled egg in the middle as a sandwich.
Here is the original recipe from King Arthur and our modifications are in the recipe below.

Savory Biscuits

Preheat oven to 400º
Combine all ingredients in a mixing bowl and mix into a soft dough.
Spoon dough onto a baking sheet sprayed with cooking spray.  Pat dough into rounds about an inch thick.
Bake 15-18 minutes until golden brown and let cool 10 minutes before serving.

Recipe of the Week – Honey Ginger Scallion Chicken

Ready for another tasty and easy marinade and basting sauce?  Our original recipe for Honey Ginger Scallion Chicken is another great marinade that you can throw together in a few minutes and is sure to please everyone at the campsite.
To prepare the marinade, chop 4 green onions, 2 cloves of garlic, and 1 T of fresh ginger.  If you’ve never worked with ginger, don’t worry. Look for it in the produce department, often near the garlic and shallots.  Ginger comes in “hands” because the large pieces often have several smaller “fingers.” If you’re like us, you don’t need that much at one time, but you can break off a finger to get as much or little as you need (think like breaking a bunch of bananas in half to buy just a few). I cut off the edges and thin skin to end up with a small piece about the size of 2 dice.  Cut thin slices, cut again into julienne, and finally mince. In the picture, the ginger is in the center.
IMG_3985
Combine with 1 T honey, 2 T soy sauce (or our favorite, San-J Gluten Free Tamari), a few dashes of Crystal hot sauce and mix well.  You could marinate for 2 hours to overnight, but I wanted to try something different this night.
IMG_8061
We picked up a grilling mat after hearing lots of people talking about how much they liked them. On this evening, after getting a good fire going, we flipped over the grill, and added the mat.  Place the chicken on the mat and pour some of the sauce over.  Once the chicken is done on the bottom, flip and add some more of the basting sauce. Flip once more just to make sure that everything is cooked through.
IMG_3176
We served this with some store-bought coleslaw, but any deli salad would be a great addition.  Let us know in the comments what your favorite deli salad is.
IMG_6046

Honey Ginger Scallion Chicken

  • 4 green onions
  • 1 T minced ginger (about 2 inches of a ginger finger)
  • 2 cloves minced garlic
  • 1 T honey
  • 2 T soy sauce
  • Dash hot sauce to taste

This makes enough sauce for 4-6 chicken breasts.
Combine all ingredients in a bowl.
On a hot grill, place chicken on a grill mat and baste with the sauce, turning and basting again as each side cooks.

Recipe of the Week – Asian Marinated Chicken with Corn and Basil Faux Fried Rice

When we’re camping, we love meat marinades.  Before we leave town, we can weigh out several meals and prep various marinades then throw them into plastic storage bags and toss them into the freezer.  While we’re out on the road, lay the prepped bag out in the fridge the night before and it’s ready to cook the next evening.
This Asian marinated chicken works great with the corn and basil fried rice, but it is also good with slaw, a salad, or any other sides that might be convenient at the campground.
IMG_1263
To prepare the chicken, place 1/3 c sliced green onions, 2 t minced garlic in a plastic bag with 3 T of soy sauce (we use San-J Tamari since it’s gluten free) and 2 T of mirin. Wait, you didn’t bring mirin to the campground with you?!  Mirin is a sweet rice wine common in Asian cooking but a good substitution would be any sweet or semi-sweet white wine that you like.  I used Chateau St. Michelle Riesling.  To the bag, add 4-6 oz of chicken for each person you are serving. The recipe calls for thighs, but we used boneless skinless breasts this time. Let the meat marinate for at least 2 hours in the refrigerator or overnight.  If you’re not going to cook it within 24 hours, put it in the freezer.
IMG_7014
When it’s time to cook, get your grill preheated while you prep the fried rice.  Rinse 1 cook of basmati rice in a sieve.  This will help remove some of the starches and will produce a less sticky rice in the end. Place the rice in a pan with 2 c of cold water, bring to a boil, reduce heat and cover for 15 minutes.  Remove from heat, fluff with a fork and leave the lid off to cool a little.  Precooked rice in a bag from the grocery is a great alternative to cooking in the RV and getting things hot inside.
IMG_2883
In a large skillet over medium heat, add 1 T oil. Add 2 T thinly sliced green onions and sauté for about 30 seconds, being careful not to burn.  Add ¾ c of frozen corn (or 2 smallish ears if using fresh) and let cook for another minute or two to thaw out the corn.  Finally add the rice and 1-2 T of soy sauce.  Let sauté for an additional 5 minutes stirring occasionally. You want the bottom and edges of the rice to get a little crispy. At the last minute, stir in ¼ c of basil cut into a chiffonade.  To cut the chiffonade, stack the basil leaves with the largest leaves on the bottom. Roll them into a little cigar and then slice into thin ribbons.
IMG_5602
IMG_9957
Cook the chicken on the grill, discarding any marinade left in the bag.
IMG_8808
To serve, divide the rice among four plates, top with chicken and zest a lime over the chicken. Cut the zested lime into slices and serve on the side.
IMG_7519
Find the original recipe from Cooking Light, September 2012, here.

Asian Marinated Chicken with Basil Faux Fried Rice

Chicken:

  • 1/3 c sliced green onion
  • 2 t minced garlic
  • 3 T soy sauce
  • 2 T mirin (or sweet white wine)
  • 4 4-6 oz chicken breast pieces or chicken thighs

Rice:

  • 1 c basmati rice, rinsed
  • 1 T olive oil
  • 2 T sliced green onion
  • ¾ cup frozen corn (or 2 small ears, kernels removed)
  • 1-2 T soy sauce
  • ¼ c basil cut into chiffonade

Place all chicken ingredients into a plastic bag and let marinate 2 hours or overnight.
Prepare rice by adding 2 cups of cold water in a sauce pan.  Bring to a boil, reduce heat and cover, cooking for 15 minutes.
Heat a skillet or wok with oil.  Add green onion and sauté for 30 seconds.  Add corn and cook another 2-3 minutes.  Finally add rice and soy sauce, cooking for an additional 5 minutes, allowing bottom and edges to get crispy.
Cook chicken on a medium high grill until done.  Discard the bag with marinade.
Divide rice between four plates and top with chicken.  Grate lime zest over chicken.  Cut the lime into wedge and serve on the side.

Recipe of the Week – Easy Chicken and Potato "Kabobs"

I love to cook, that is not a surprise to anyone who knows me (Brian).  I don’t love to spend a lot of time cooking usually (though I do believe that making a wonderful, intricate recipe can also be very cathartic in the right time and place).  This recipe from the Baking Beauties at Faithfully Gluten Free is simply my all time favorite marinade.  I call it dump marinade because it has a little bit of everything in, you can dump in any protein you want, and it will come out amazing.  Kabobs are a challenge to me.  It is difficult to get everything done together without burning the more delicate items, hence the second dump of this recipe, where I just throw it all on the grill and forget the skewer!
First the marinade: Put into a gallon resealable bag put 1/4 t dried rosemary (I didn’t carry rosemary in the RV this time so substituted dried oregano and it worked just fine), 1/2 t each of dried parsley, garlic powder, and black pepper, 1 t stone ground mustard, 1 T each balsamic vinegar, soy sauce, and Worcestershire sauce, and 2 T olive oil.  WOW that’s a lot of ingredients!  Now throw in about a pound of your favorite protein.  We love this with chicken thighs (in the pictures) but beef works well too (or country style pork ribs, chops, or an old tire, seriously this marinade tastes that good!).  A note on gluten free: soy sauce is one of those items with hidden gluten in it, always make sure to check labels of sauces and condiments to ensure they are safe if you or someone you are cooking for can’t have gluten.IMG_5847
Let the meat marinade for at least two hours.  I put the meat in the marinade the night before but we ended up eating out the next day so I just threw the whole thing in the freezer.  A week later, I took the bag out one evening and cooked it up the next day, it was still perfect!
Even the smallest potatoes take forever to cook on a grill.  Here’s a great tip stolen from the Baking Beauties: cook them in the microwave first!  I put them in and hit the potato button, they always come out a little under done, but then the time on the grill with the other raw veggies, and they are perfect! (Too many explantation points in this post, but I really love this recipe!)
We always add onions and mushrooms at minimum when we cook this meal but bell pepper, asparagus, zucchini, and summer squash are also great additions.  Cut your veggies into largish bite sized pieces.  The less dense the vegetables are, the bigger the pieces should be so they hold up.  Here’s another tip for the mushrooms: if you cut it in half and find lots of dark fins (especially common in portobello), scoop them out with a spoon or knife because they are bitter and turn mushy when cooked.
IMG_1062
If you are assembling kabobs, layer meat, potatoes, and veggies (obviously not the asparagus, but if you get one on a skewer, please put a picture in the comments, haha) onto a wooden or metal skewers. Don’t forget that wooden skewers should always be soaked in water for 30 minutes first to keep them from catching on fire.  I like the metal ones because they help to cook the food from the inside a little too.
I don’t like to take the time to thread skewers most of the time, so I toss all the veggies together, drizzle with some oil and salt and pepper and toss ’em on the grill.
IMG_0845
If you use foil, poke a few holes so the juices run out – you want crispy browned edges, not a soggy mess.

Once the veggies get going, put the meat on the grill and cook to your desired degree of doneness.
IMG_3977
YUM!! BTW, thats a little bit of ranch dip on the side. It’s amazing on the potatoes!
IMG_0456

Easy Chicken (or Steak) “Kabobs”

For the marinade:

  • 1/4 t dried rosemary (or other dried herb such as oregano or basil)
  • 1/2 t dried parsley
  • 1/2 t garlic powder
  • 1/2 t ground pepper
  • 1 t stone ground or dijon mustard
  • 1 T balsamic vinegar
  • 1 T soy sauce or tamari sauce
  • 1 T Worcestershire sauce
  • 2 T olive oil

For the grill:

  • 1 lb chicken thighs or marinating beef
  • 1 lb of small potatoes (red or Yukon)
  • Optional bell peppers, onion, mushrooms, etc.

Mix all of the marinade ingredients into a resealable plastic bag and smoosh them around to make sure everything is mixed. Add the meat and refrigerate for at least 2 hours or overnight.
Soak wooden skewers in water to keep them from catching on fire.
Cook the potatoes in the microwave until almost completely done. Cut other veggies into similar sized pieces.
Thread all of the ingredients onto skewers and discard used marinade or…
Place veggies in a bowl and drizzle with oil, salt, and pepper. DO NOT put used marinade onto the veggies, as tempting as they may be. No one wants a side of salmonella with their dinner!
Place kabobs onto a medium high grill and turn every few minutes until done or…
Place veggies on grill and toss occasionally to keep searing fresh sides without burning. Place meat along side and turn after about 3-5 minutes.
Serve immediately with a cold beer and enjoy!

Bonus Recipe – Michigan Cherry Chocolate Gluten Free Cookies

Anyone who has been to Traverse City knows that you can’t leave town without some cherries. We made a stop at the Cherry Republic and picked up some of their dark chocolate covered cherries and we felt inspired so here is the most amazing cookie we have ever tasted!

Cherry Chocolate Chip Cookies

  • 1 C plus 2 T King Arthur Gluten Free baking mix
  • 1/2 C butter, softened
  • 6 T Whey Low sugar substitute
  • 6 T Whey Low Gold brown sugar substitute
  • 1 egg
  • 1/2 t salt
  • 1/2 t baking soda
  • 1 t Kraken dark spiced rum (because I didn’t bring vanilla)
  • 1 cup of Cherry Republic dark chocolate covered cherries, cut into halves

Preheat oven to 375°
Cream together butter and sugars then beat in the egg, salt, baking soda, and rum until creamy.
Add the flour and cherries and blend until incorporated.
Spoon onto a cookie sheet and bake for 10 minutes or lightly golden. The recipe should make 24 cookies.
Try not to eat the entire tray because these take chocolate chip cookies to a whole new level!

Recipe of the Week – Pasta with Roasted Cauliflower, Tomatoes, and Pepperoni

Before you turn your nose up on this one, keep on reading.  It doesn’t sound like its going to work, but it is actually really good and quite easy to make over the campfire itself, at home in the oven, or even on the grill.
IMG_8975The original recipe comes from the January 2013 issue of Women’s Day and you can find it here.
If you’ve been reading my recipes so far, you know that I don’t do a great job of following the recipe exactly, and this one is no exception so read carefully for my modifications. As always, I’ve cut the recipe in half during preperation since only two of us are eating and we don’t want leftovers.  All of the quantities listed are the full amounts.
Start off by cooking 12 oz of your favorite short pasta.  Shells or rotini would work best.  We use gluten free pasta when we cook because Michelle is celiac.  There is some debate about adding oil to your cooking water.  Generally you SHOULD NOT do it but this recipe is an exception.  When you pour the pasta out of the pan, the oil floating  on the top of the water will coat the pasta which will help keep it from sticking together while it waits to be added to the grill.  This is the same reason you should not do it normally, it will keep the sauce from sticking to the pasta!
While the pasta is cooking, cut up a smallish head of cauliflower into bite size flowerettes. If they are too big it will take longer to cook and you run the risk of burning the outsides.  Also cut up a pint of grape tomatoes into halves. Throw it all onto a grill pan (or piece of heavy duty foil). Next give it all a drizzle of olive oil, salt (not too much), pepper, and garlic pepper.  Finally top it with sliced pepperoni. Do not mix it up at this point.
IMG_7102
By now your pasta should be done cooking. Drain it and put it into your serving bowl.  If you didn’t add oil to the water, add a little now and mix it all together. Take everything outside to the grill.
IMG_7141
On a medium grill, let things get good and hot and once you see that the edges of the cauliflower are browning and the tomatoes are giving up some juice, start to mix it up a bit.  Now you just have to play it by ear.  You want the cauliflower to get nice and browned and the tomatoes to get a good blister.  I like it when the pepperoni get a little crunchy too, plus they will give up more oil which will lube up the veggies.IMG_6729
Once everything is to your desired degree of doneness, pour it on top of the pasta and mix it all together. Sprinkle with some parmesan cheese and fresh parsley or green onions and dinner is ready!IMG_7141 2
So my modification on ingredients was just the addition of the garlic powder and parmesan cheese.  You could also add lots of other veggies if you want. I think zucchini, asparagus, or mushrooms would all make a great addition.  If your not a pepperoni fan, smoked sausage, grilled chicken, or even shrimp could be nice.
Here’s my version, check out the link at the top if you want to cook the whole thing in the oven at home.

Pasta with Grilled Cauliflower, Tomatoes, and Pepperoni

  • 1 small head of cauliflower, cut into bite size pieces
  • 2 T olive oil, divided
  • Salt, pepper, and garlic powder to taste
  • 12 oz small pasta such as rotini or shells
  • 1 pint of grape tomatoes
  • 6 oz pepperoni
  • 2 T parmesan cheese
  • chopped parsley or green onions for garnish fish (optional)

Cook the pasta with a little oil in the pot.  While the pasta is cooking, layer the cauliflower and halved tomatoes on a grill pan or piece of heavy duty foil (on a cookie sheet to carry out to the grill).  Drizzle the remaining oil and sprinkle with salt, pepper, and garlic powder.  Cover with pepperoni.
Drain the pasta and take everything out to the grill.  Grill the veggies for about 3-5 minutes before stirring to mix the pepperoni in.  Let the cauliflower brown and tomatoes blister.
Mix the veggie mixture into the pasta and sprinkle with parmesan cheese and garnish.
Let us know what you think of this recipe by leaving a comment!

★ 25 years guiding ★ 48 U.S. states ★ 10 countries ★ 3,000+ Camino miles