If you’re following us in Instagram (@cruisinwiththecolemans) you probably already know the we are in Florida right now celebrating Christmas with my parents at Lake Lochloosa. We’re thrilled to get to spend some time with them but we’re even more excited to be heading to the beach later this week.
Before we head out to do some kayaking with (hopefully) manatee and not alligators, I wanted to share one more special holiday recipe – dressing. In the Coleman house, we never stuff the turkey. It’s always roasted with plenty of butter, onion, herbs, and spices, but our dressing is served on the side where the edges can get crispy and I know there is no risk of undercooking. Anyone who is gluten free knows that you can’t run into the grocery store and buy a box of gluten-free dressing mix, so this treat has to be a little more labor intensive than usual, but it’s always made with a secret ingredient, LOVE!
Preheat the oven to 250º. Start out with fourteen slices of bread. We use Kinnikinnick gluten-free bread and for this batch we used half white and half multigrain. Stack the bread up and using a serrated bread knife, cut the pieces into quarter inch cubes and toss them into a large bowl.
Melt a stick of butter and add two teaspoons of poultry seasoning, two teaspoons of parsley, and one teaspoon of garlic powder. Pour the butter mixture over the bread and mix thoroughly to get every piece of bread covered in butter and spices.
Spread the mixture on two cookie sheets so that the bread cubes are not crowded and put them in in the oven. The next step is going to take a while, so I hope you’re not in a hurry. Bake the cubes for one hour, stirring them every 10 to 15 minutes. You want the cubes to dry out but not brown or burn. Think of how Stove-Top looks coming out of the box, and that is your goal. Depending on how fresh the bread is, it may even take an hour and a half.
By the way, at this point , these make excellent croutons for a salad!
Dice two stalks of celery, a medium onion, and two cloves of garlic.
Sauté half of a pound of celery in a skillet and add the vegetables. Cook until the celery and onions are soft.
Add the mixture to the bread cubes in a large bowl. Add two cups of chicken or turkey broth and stir until it is mostly absorbed by the bread. Taste the mixrture to adjust seasoning. Add salt is needed. Stir in two eggs and if the mixture is dry, a little more broth.
Pour the entire mixture into a greased casserole dish and bake at 350º for an hour.
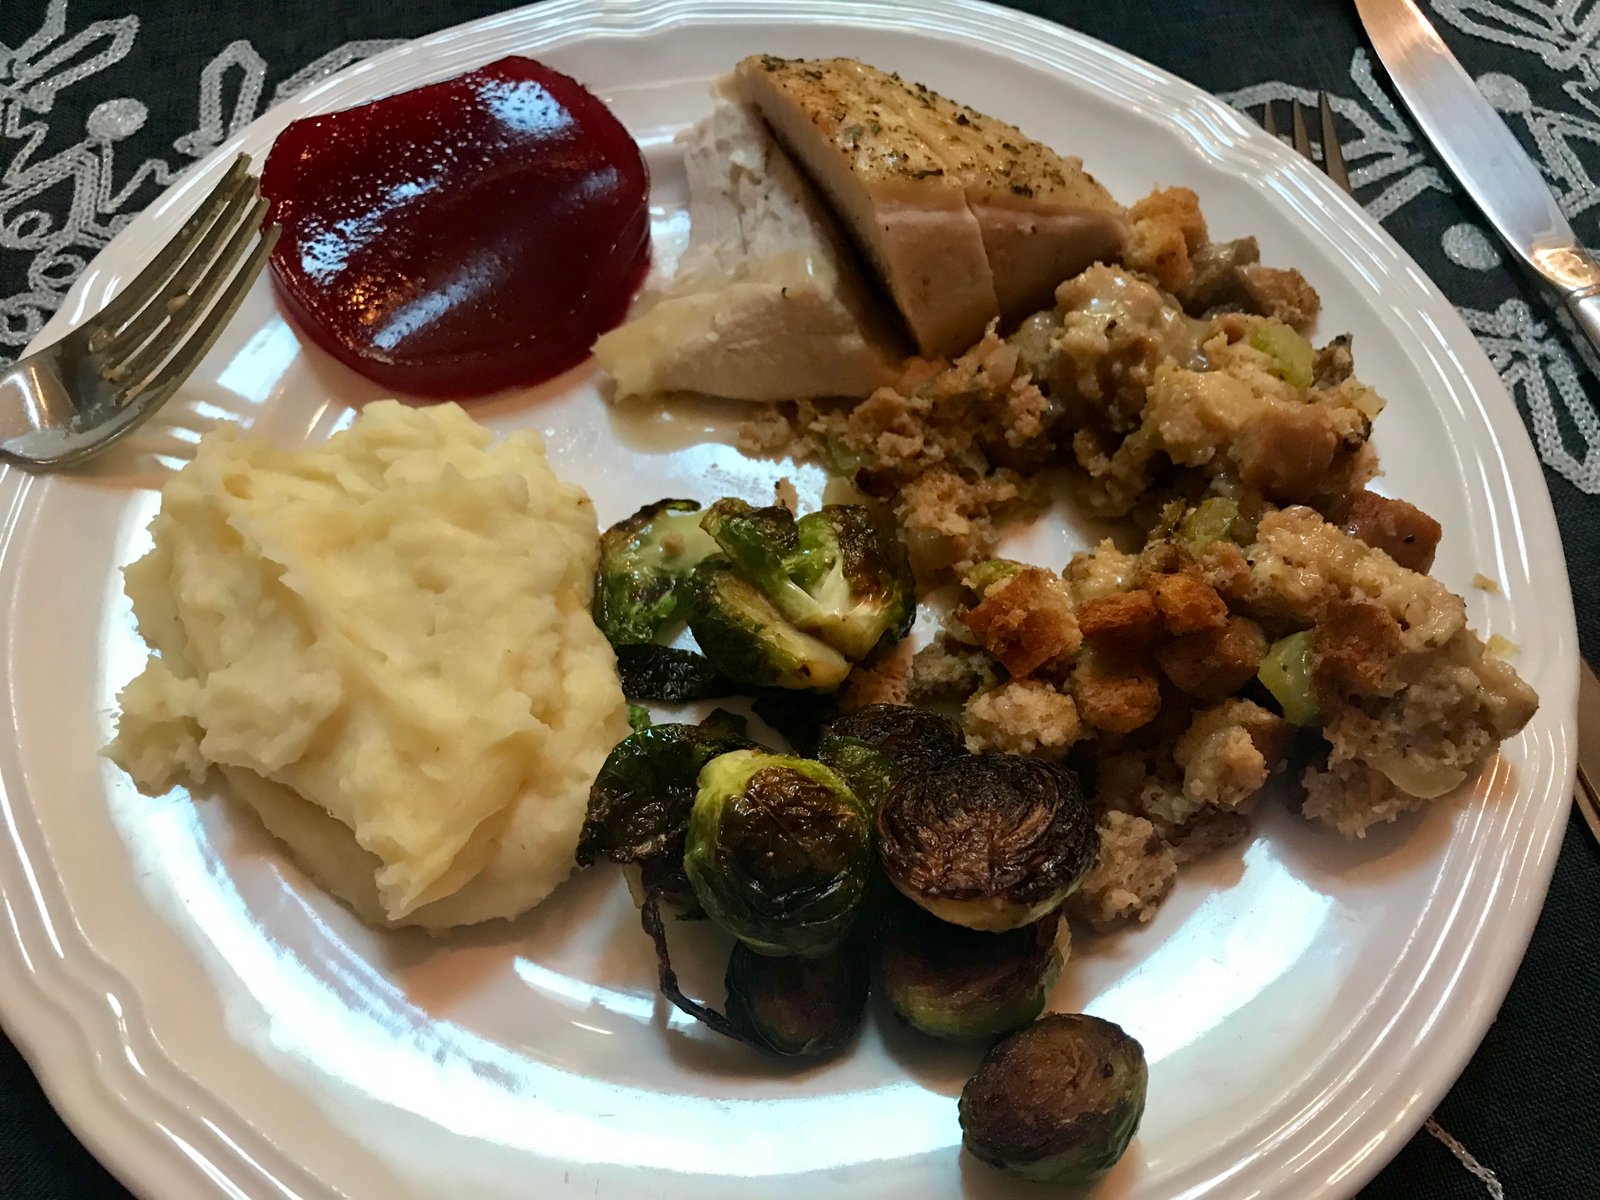
Our Thanksgiving menu included Roasted Turkey, Holiday Mashed Potatoes, Brussel’s Sprouts, Dressing, and of course canned cranberry sauce. For dessert, everyone enjoyed Gluten Free Praline Pumpkin Pie.
Holiday Dressing
14 slices of gluten free bread
1/2 c (1 stick) melted butter
2 t poultry seasing
2 t dried parsley
1 t garlic powder
2 stalks celery
1 medium onion
2 cloves of garlic
1/2 pound breakfast sausage
2-3 cups of turkey or chicken broth
2 eggs
Preheat the oven to 250º. Using a serrated knife, cut the bread into 1/4 inch cubes. Melt the butter and add the poultry seasoning, parsley, and garlic powder. Stir the seasoned butter into the bread cubes and make sure they are well coated. Spread onto 2 cookie sheets and bake for an hour, stirring every 10-15 minutes until the cubes are dry but not browned.
Dice the celery, onion and garlic. Sauté the sausage in a pan and add the vegetables. Cook until soft.
Mix the sausage mixture into the bread crumbs. Add the broth and taste to adjust seasonings. Add salt if needed. Stir in the eggs and add more broth if the mixture seems too dry. Pour into a greased casserole dish and bake at 350º for an hour.
Welcome to the new and improved Cruisin’ with the Colemans website. Here’s a huge shout out to our web designer Elizabeth Kimmel for a fantastic job! Make sure that you click around and explore everything that we have to offer and stay tuned for new features that will be coming soon, including an Etsy store selling prints of some of our favorite travel photos.
As promised before our hiatus, here is my recipe for Gluten Free Praline Pumpkin Pie! When Michelle had to go gluten-free six years ago due to a diagnosis of lifelong heath issues we were concerned many favorite special treats would have to disappear from her diet. Surely we both had to make major adjustments to our cooking, but over the years we have found and developed our own recipes to include most of our favorite menu items into a gluten-free diet. Pie crust is one of those items. I have found two different pie crusts that work well with non-wheat based flour, a pat-in-the-pan crust that involves no rolling and the one that I have here. I have used them both for sweet and savory pies with great success, but this roll out dough is my favorite because it turns out both crispy and flaky. At Thanksgiving dinner this year with some of our neighbors, the ladies asked how I got the crust so flaky and were shocked to discover it was wheat free! With more than a hundred years of pie making experience at the table, I took it as a great compliment!
Let’s start with the crust. Cut a stick of butter into eight slices and put in the freezer while you gather the rest of the ingredients. You’ll need all purpose gluten free flour (such as Pamela’s Artisan Blend), salt, white and dark brown sugar, pecans, more butter, pumpkin puree, evaporated milk, an egg, and almost every spice in your rack. Finally get a measuring cup of water and add several ice cubes.
Preheat the oven to 450º. In the bowl of a food processor (I love my Ninja) place one and a quarter cups of all purpose gluten free flour blend, a teaspoon of salt, and two tablespoons of sugar (we always use Whey Low sugar substitute) and give it a quick pulse to mix the ingredients. Add the butter directly from the freezer and pulse eight to ten more times to combine into a crumbly texture with pea-sized pieces of butter remaining.
Add four tablespoons of ice cold water to the processor and mix together. The dough should mostly clump together and but still appear dry. If the humidity is dry, you may need one to two more tablespoons of water. Be careful not to end up with a sticky mess or you will not be able to roll it out.
Pour the mixture onto a large piece of parchment paper and press together into a mound. Using as little additional flour as possible and a rolling pin, roll into a thin round circle about an inch bigger than the top of your pie pan.
Don’t worry if the edges crack like mine, you’ll be able to press them back together once you line the pan. If the dough is a little too wet, a second piece of parchment on top may be helpful. Carefully transfer the dough to a 9-inch pie pan. If things totally fall apart here, don’t panic. I’ve always found that the worse the crust looks, the easier time you will have convincing everyone that it’s totally home-made. Break off any pieces that are overhanging the edge of the pan and use them to fill in any gaps or cracks that you have. Tuck the edges down and crimp around the pan to create as decorative and edge as you wish.
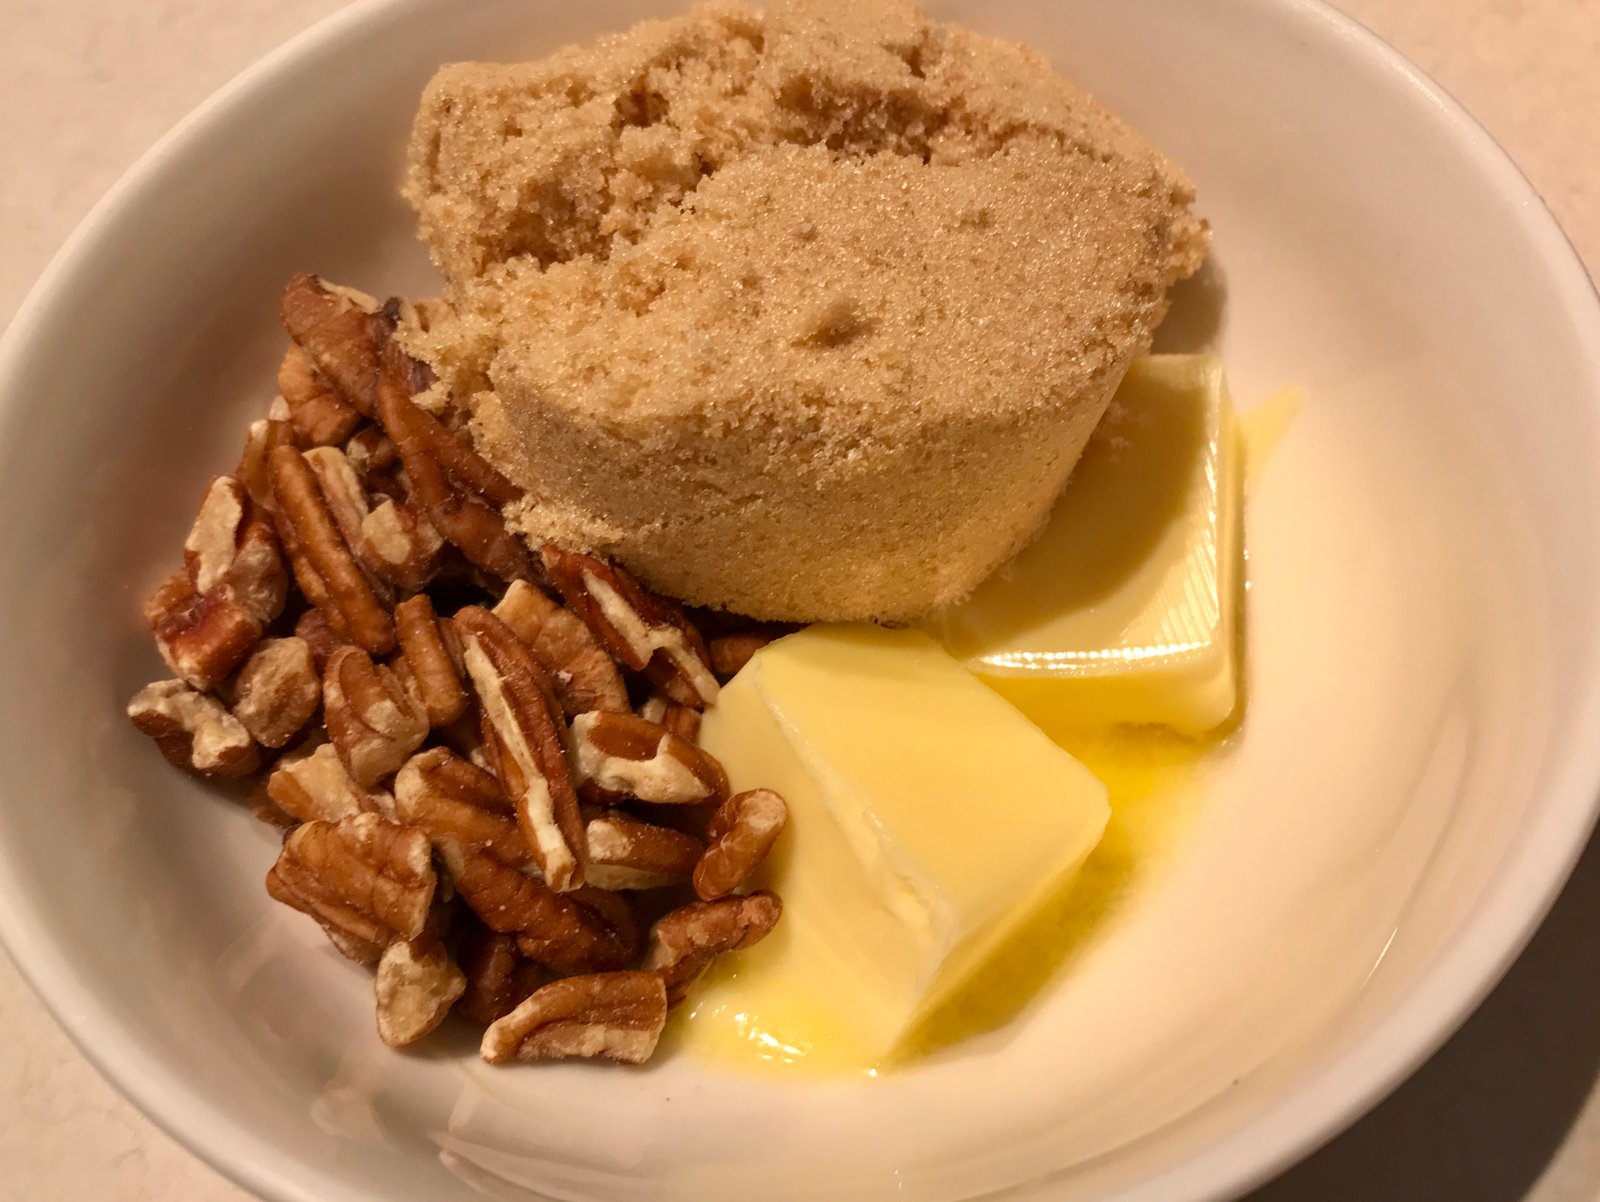
In a small bowl soften two tablespoons of butter and add a third of a cup of brown sugar (such as Whey Low Gold) and about half a cup of chopped pecan pieces.
Mix together with your fingers to create a chunky paste and crumble it into the bottom of the pie pan. Bake for ten minutes until the sugar is bubbly and the crust is set.
You do not want the crust to brown at this point. If the crust gets air bubbles, prick it with a fork. If it begins to slide down into the pan, press it back up with the back of a fork. Once the crust is prebaked, set it aside while you make the filling. Lower the oven to 400º.
Melt one tablespoon of butter in a saute pan and add a 15-oz can of pumpkin puree. This will not only give a toasty flavor to the pie but remove excess liquid from the pumpkin. Let it cook for about ten minutes, stirring occasionally.
Meanwhile, in a large bowl combine a quarter cup of sugar (or Whey Low sugar substitute) a quarter cup of brown sugar (again, Whey Low Gold), two teaspoons of gluten-free all purpose flour blend, one teaspoon of cinnamon, half a teaspoon of ginger, a quarter teaspoon each of salt, nutmeg, and clove, and a dash of allspice. Mix together well to ensure that all of the spices are well combined.
Add one egg and the entire can of evaporated milk and mix thoroughly then stir in the pumpkin. The mixture will be very wet.
Unfortunately this is were things begin to fall apart for me. Because I was cooking several other items at the same time (it was Thanksgiving dinner after all, I forgot to continue taking pictures so you will just have to use your imagination!
Pour the filling into the pie crust. There may be more than you can use, if so, pour the extra into lined muffin cups. Bake the pie for one hour and check that it is set. If the crust is beginning to brown too much, cover the edges with foil to prevent burning. The pie is done when the center is set and no longer jiggles. Don’t worry if the filling cracks in places, you’re going to cover that up with whipped cream anyway, right?
By the way, the secret to the flaky crust? It’s the praline! The caramel layer in the bottom of the crust keeps the pie filling from getting the crust soggy. We hope you enjoy our favorite pumpkin pie, leave a comment below to tell us about your favorite Thankgiving dessert.
Gluten Free Praline Pumpkin Pie
For the crust
1/2 cup butter (1 stick)
1 1/4 cup all ourpose gluten free flour blend
1 t salt
2 T sugar (may omit if making a savory pie)
4 T (or more) ice cold water
For the praline
2 T butter, softened
1/3 c brown sugar
1/2 c chopped pecan pieces
For the filling
1 T butter
1 15-oz can pumpkin puree
1/4 sugar
1/4 brown sugar
2 t gluten free flour blend
1 t cinnamon
1/2 t ginger
1/4 t salt
1/4 t nutmeg
1/4 t clove
dash allspice
1 egg
1 12-oz can evaporated milk
Begin by cutting the butter into 1 T size pieces and and freeze while you gather the remaining ingredients. Pre-heat the oven to 450º.
Combine flour, salt, and sugar in a food processor bowl. Pulse to mix. Add butter and pulse 8-10 times until the butter is mixed but some pea sized pieces remain. Add 4 T ice cold water and pulse again until the dough begins to hold together. You may need to add additional water but be careful that it doesn’t gett too sticky.
Turn the dough out onto a large piece of parchment paper and press together into a flat disk. Useing as little extra flour as possible, roll out the dough with a rolling pin into a circle about 1 inch parger than your pie pan.
Carefully, transfer the crust to a 9-inch pie pan. Press cracks together and pinch the edges to make a decorative crust. Prick the sides of the crust with a fork to keep it from bubbling up. Put the dough in the refridgerator until you are ready to add the praline and bake.
To make the praline, soften the butter and add the brown sugar and pecans. Mix together with your fingers and crumble into the bottom of the pie crust. Bake at 450º for about 10 minutes. Do not the the sides brown and use the back of a fork to press them back up if they start to slouch. When the praline is bubbly, it’s done. Lower the oven to 400º to bake the pie.
Melt another tablespoon of butter in a sauté pan and add the pumpkin. Stir together and simmer over medium heat for 10 minutes.
In a large bowl, combine sugar, flour, and spices and mix thoroughly. Add the egg and evaporated milk and whisk until smooth. Stir in the pumpkin. The mixture will be runny. Pour into the pie crust. If there is extra, pour it into lined muffin tins. Bake the pie for approximately 1 hour until the center is set. If the crust begins to get too brown, cover the edges with foil.
★ 25 years guiding★ 48 U.S. states★ 10 countries★ 3,000+ Camino miles
RV tips, travel inspiration, and updates on the trips we're planning — delivered to your inbox each month.
Questions about this trip?
Send us an inquiry.
Tell us what you'd like to know about this trip and we'll get right back to you.
Know before you go
Activity Level.
Every Cruisin' with the Colemans trip comes with an activity level so you know, before you lace up, roughly how hard the walking will be. Think of it as the overall rhythm of the trip — a few days might push a little past it and a few will feel gentler, but it's an honest read on what your legs are signing up for.
Nobody knows your body better than you do. We're all for a good challenge, but pick a level that matches your current fitness and trail experience and the whole walk gets more fun. Not sure where you land? Reach out — we've walked every one of these ourselves and we're always happy to talk it through.
Grades
EasyEasy0–8 km (0–5 miles)
Gentle, mostly flat days on well-kept, easy-to-follow paths. Ideal if you're new to multi-day walking or simply want a relaxed pace with plenty of time to soak it all in.
Easy – ModerateEasy–Moderate8–16 km (5–10 miles)
A little more distance over mixed ground — mostly maintained trails, quiet lanes, and the occasional gentle climb. A good fit if you're reasonably active and ready for a few longer stretches.
ModerateModerate16–20 km (10–12 miles)
Fuller days on varied, sometimes rugged terrain with regular ups and downs. Great for steady hikers in good shape, or determined first-timers chasing a real sense of accomplishment.
Moderate – StrenuousModerate–Strenuous20–24 km (12–15 miles)
Long days with sustained, often steep climbs and descents on rough trail. You'll want solid fitness; a few exposed spots call for a head for heights, and navigation can get trickier when the weather turns.
StrenuousStrenuous24–28 km (15–17 miles)
Big days on demanding, often remote mountain terrain — serious distance and elevation for experienced, fit hikers. Expect rough footing, the odd exposed or aided section, and higher altitude on some routes.
ExtremeExtreme+28 km (+17 miles)
Our toughest walking, built for very fit, very experienced hikers. Rugged, sometimes remote mountain terrain with scrambling, exposure, and aided sections — plus altitude, weather, and navigation that all add to the challenge.
Where you rest
Accommodations Levels.
Where you sleep is part of the story, so we hand-pick locally run places that welcome you like an old friend. The level shifts a little from trip to trip depending on the route, but the goal never does: a clean, comfortable, genuinely local stay at the end of every walking day.
Most nights you'll land in friendly, independent or family-run hotels, guest houses, and B&Bs chosen for their charm and the little touches that feel like home. Some trips lean a touch more luxurious; others, especially in the remote stretches, mean simpler refuges or huts. Either way, we've picked each one to help you rest up and wake ready for the trail.
Basic – A Place to Rest Your HeadBasic
Mountain huts, refuges, and simple B&Bs. Ensuite rooms aren't a given, and you may share a dorm with fellow walkers — but what you trade in polish you more than gain back in camaraderie and a big, rustic welcome.
Classic – Charming Without the FrillsClassic
Locally owned B&Bs, guest houses, and small inns that feel like a home away from home — usually family-run, cozy or freshly kept, and well placed for the next day's walk. A warm welcome comes as standard.
Comfort – A Little More...ComfortableComfort
Characterful, locally owned hotels and B&Bs with the little extras that make a stay feel special — décor rooted in the region, the occasional spot to unwind, and sometimes a kitchen worth lingering over.
In Style – For Those who Want to Treat ThemselvesIn Style
First-class stays in boutique hotels, vineyards, and country manors — often in the best seats in the house, from hilltop towns to the water's edge, with standout service and, now and then, a truly memorable table.
Mixed – Boutique Hotels to Mountain Huts, all in One TripMixed
One trip, a bit of everything. You might bed down in Classic or Comfort rooms through the towns and villages, then a refuge or other Basic spot up in the mountains where that's all there is — an honest, memorable mix that matches the journey.